
Sometimes as the phones get older, they are more prompt to failure. iPhones are no exception, as after some time they tend to have some sort of technical issues, commonly software or hardware ones. Among them, that iPhone won't turn on is also reported and complained by lots of Apple users in different posts and forums or Apple support center. This problem has a few causes, nothing to stress about as in this article you will be provided 6 easy solutions for why iPhone won't turn on. Let's take time to learn all one after another.
- Part 1: Charge iPhone
- Part 2: Force Restart
- Part 3: Make Update and Restore iPhone
- Part 4: Put iPhone to Recovery Mode
- Part 5: Have Physical Damage or Liquid Check
- Part 6: Fix iOS System with Professional Software (Hot)
Solution 1: Recharge
If your battery is totally drained you will not see the red battery image usually present there on low battery. Just plug your charger in and wait a few minutes to see whether the battery icon appears or not. Be aware of the fact that Apple's firewire does not work properly for charging phones, so it would be recommended that you use a high-powered source to fix iPhone cannot turn on issue.

Solution 2: Hard Restart
To normally restart an iPhone, you need to hold the Power button until the red slider appears. Slide it and after the phone shuts down, power it back up as you normally would. If the iPhone won't turn on at all or if the phone is frozen, try using this method:
Press the Power button and the Home button together for at least 10 seconds. If the Slider comes up or if the screen brightness diminishes, keep pressing these 2 buttons until the Apple logo appears. Of course, if your screen is black and you can't see the slider or the screen diming out, keep pressing the two buttons until the Apple logo appears.
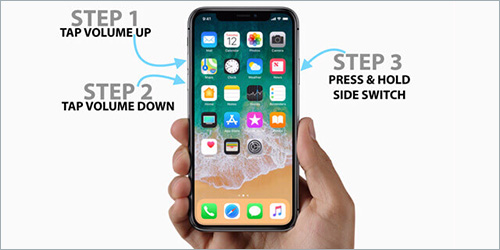
The iPhone 7 and 7s users need to hold down the Power button with the Volume Down instead, to get a force reboot, as Apple has changed this with the newer generation phones. For iPhone 8 and its later versions, quickly press and hold Volume Up button, do the same operation for Volume Down button and lastly press the Side/Power button to have a force reboot.
Solution 3: Backup and Restore
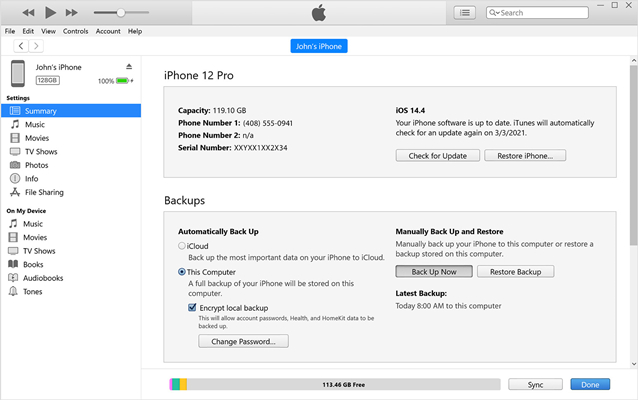
Sometimes factory resetting your iPhone is the only thing that's left to do. Fortunately, there is a way to back up all your current iPhone data with iTunes. Just make sure you always have the latest version of iTunes installed before connecting the actual phone to your Mac or PC. Proceed to perform a backup so everything you have shared between the devices is up to date. After this, click on the "Summary" tab and then click "Restore iPhone…" option. Wait until your iPhone completes the process and you are done.
Solution 4: Recovery Mode
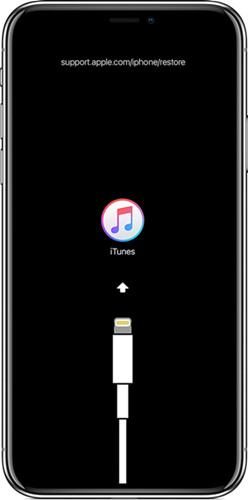
Forcing your device into recovery mode deletes all your data on it. Make sure you have synced and backed up all your iPhone data to iTunes/iCloud or save on computer firstly before put your iPhone to recovery mode. Now, turn off your iPhone, plug the USB cable into the computer only and keep iPhone unplugged. Hold down the Home button on iPhone, then plug the USB cable into your iPhone. Release it until you can see the "Connect to iTunes" symbol.
Solution 5: Check for Physical Damage or Liquid
If you have dropped your iPhone and it still works fine, you are one of the lucky people, as phones are not as tough as they look. Drops of waters and spills can cause permanent damage to your iPhone and thus preventing it from turning on. Water is very unpredictable though, as a single splash from a few days ago can cause a problem to occur for the first time only after a while.

Solution 6: Fix iPhone won't Turn On with System Recovery Software
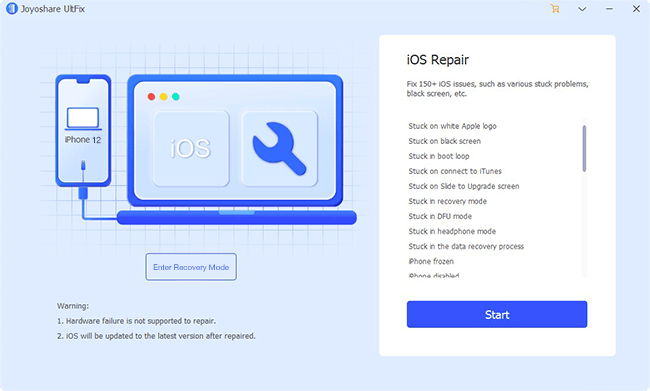
Joyoshare UltFix iOS System Recovery is a nice addition to the solutions for this problem. The software can repair over 30 iOS system issues, like iPhone won't restore, white Apple logo, black screen, iPhone stuck in DFU mode, iPad frozen, etc. without the loss of any of your precious data, with only a 3-step process.
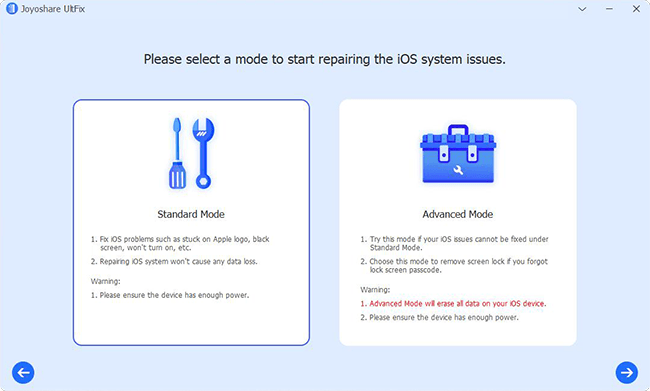
You can use one of its 2 modes, these being Standard and Advanced, to either fix problems regarding the iOS system without data loss or to safely and easily restore the iPhone to its factory settings. On top of that, it is fully compatible with the latest iOS 12 and the recent iPhone XS/Max/XR. There is also a free option offered to let you quickly and instantly enter and exit your iPhone to recovery mode with just one click.
Key Features of Joyoshare UltFix iOS System Recovery:
Free enter/exit recovery mode
Repair 30+ iOS system issues without data loss
Work well for diverse iPhone models and iOS versions
Factory reset iPhone, iPad or iPod touch without passcode
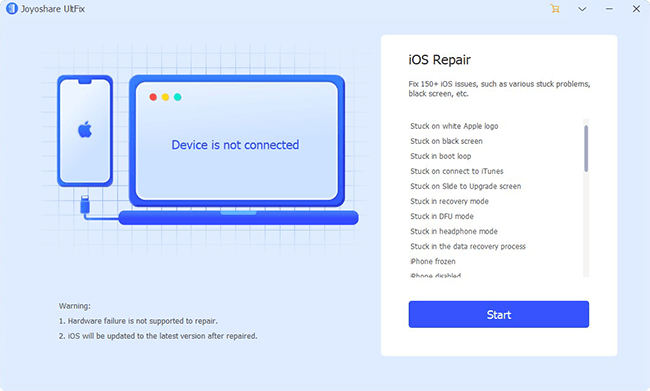
Step 1 Run program and connect iPhone

After installing and launching Joyoshare UltFix iOS System Recovery, you can go to plug your iPhone to the computer. Once it is connected, you should click on the "Start" button to go on next step.
Step 2 Set DFU/Recovery mode under "Standard" mode
To conduct a repair process with no data loss, you should select the "Standard" mode to continue. Simply press "Next" button and go to put your iPhone to DFU mode or Recovery mode as you want. You can also head to the main interface to tap on "Enter Recovery Mode" quickly.
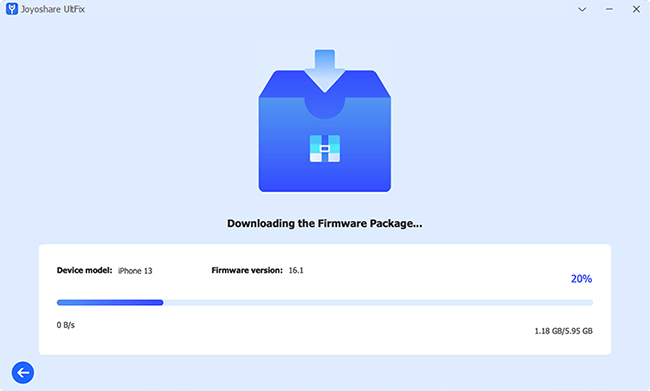
Step 3 Download and verify the firmware package
Soon after, Joyoshare iPhone repair software will detect and display your iPhone device info for you to check. After confirmation, you ought to click the "Download" button to download and verify the firmware package.
Step 4 Repair iPhone screen won't turn on
Now you can get down to pressing the "Repair" button to let this program unzip the firmware package and fix iPhone won't turn on problem for you. It will perform well and make your iPhone back to normal without hassle.

Conclusion
If you are one of the people that experience problems with your iOS devices, hopefully at least one of these 6 answers to the question how to fix an iPhone that won't turn on; help you solve your issue. Being it a black screen of the iPhone or something else, thus saving you time and money that would otherwise be invested in a brand-new phone. If the problem is not software-related but hardware-related, you should preferably visit only authorized Apple service assistant stores to ensure the proper repair of your device, without the fear of it happening again.
