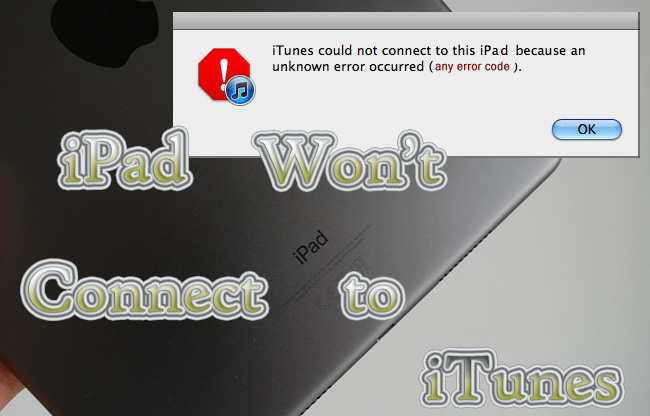
There is a possibility that your iPad cannot be recognized by iTunes when connecting it to the computer with a USB cable. Four reasons should be considered – damaged cable and dirty port, wrong settings on iPad, iTunes error, and iPadOS glitch. Therefore, this article is going to tell you how to troubleshoot the real cause resulting in your iPad won't connect to iTunes problem from these four aspects. Please read carefully and follow the guide one by one, step by step. Only by this can your iPad be used as usual.
- Part 1. Methods to Check iPad and iTunes
- Method 1. Restart iPad
- Method 2. Enter DFU/Recovery Mode
- Method 3. Check USB Cable and Port
- Method 4. Check Apple System Status
- Method 5. Check Internet Connection
- Method 6. Disable Low Power Mode
- Method 7. Change Date & Time Settings
- Method 8. Remedy Location & Privacy Settings
- Method 9. Sign Out of and Re-sign In Apple ID
- Method 10. Update or Reinstall iTunes
- Part 2. Fix iPad Connection Failure via Joyoshare UltFix
- Part 3. Reinstall Apple's Windows Driver
Part 1. Methods to Check iPad and iTunes
Method 1 Restart iPad
As soon as you are aware of the connection failure with your iPad, the first thing you need to do is to restart your iPad. Note that you have to unplug your device from the computer, and then do the restarting operation. To turn it off, you only need to open Settings, enter the General screen, find Shutdown at the bottom and drag the power-off slider. To turn it on, press and hold the Power button for seconds. When your iPad awakes, try to plug it into your PC again.
Method 2 Enter DFU/Recovery Mode
Putting your iPad into DFU mode or recovery mode is a quickest way to solved detection error. Plug your iPad into computer and follow these steps to enter DFU mode for different iPad models. (Alternatively, use Joyoshare UltFix to enter recovery mode for free)
- Step 1: Hold Power and Home buttons at the same time for around 5 seconds.
- Step 2: Release the Power button but keep holding the Home button for around 10 seconds. Your iPhone screen will keep black if it has entered DFU mode successfully.
- Step 1: Quickly press and release the Volume Up button, do the same to the Volume Down button.
- Step 2: Keep holding Power button and release it when your iPad screen goes black.
- Step 3: Hold both Power and Volume Down buttons for around 5 seconds.
- Step 4: Release the Power button but keep holding the Volume Down button for around 10 seconds. If your screen is black, it means that iPad has entered DFU mode already.
Method 3 Check USB Cable and Port
A damaged or incompatible cable is a trigger causing this issue. Meanwhile, if the charging port is blocked with dust or debris, your iPad will fall into laggy connection. So, check whether these two things are clean. If it is totally pure, you could use others cable or buy a new one instead. If they work normally in other devices, you may go ahead to check other causes.
Method 4 Check Apple System Status
To rule out the chance that the Apple server is on maintenance, visit the Apple System page to check if there is a green dot in the front of iTunes options. In case the fact is in opposition, you have no choice but to wait for Apple to fix it.

Method 5 Check Internet Connection
iPad can't connect to iTunes? No internet connection could be doubted as a cause as well. Hence, if your iPad is set up with an invalid network, iTunes is not able to detect it. There are three features waiting to be checked: Wi-Fi, cellular and VPN. Let's start with the Wi-Fi network, toggle it off first, and enable it. Then, disconnect the network by tapping the "i" icon and hitting the Forget This Network button. After that, add a usable network again.
As for cellular, turn it off and on likewise. But this time, disable Low Data Mode on Cellular settings to make sure that your internet connection is stable. The deal with VPN, you should disable it on Settings and exit any VPN app if you are running.
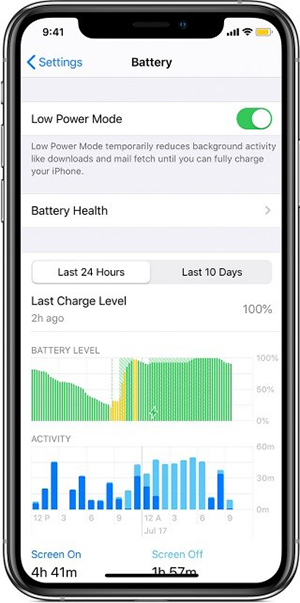
Method 6 Disable Low Power Mode
If your iPad is nearly out of battery, Low Power Mode will help you prolong the time. However, it sometimes gets in the way of iPad recognition. To avoid this effect, make sure your device is fully charged and go to Settings → Battery to toggle off Low Power Mode. Then, plug it into computer and open iTunes to see if it could be connected.
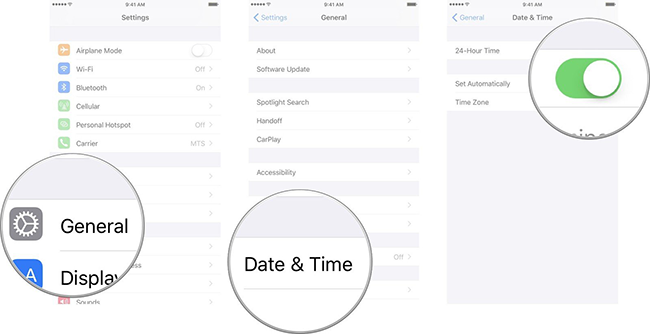
Method 7 Change Date & Time Settings
Change the Date & Time settings if you have mistakenly set it in another time zone. Open the Settings app, select General, tap Date & Time, and check whether the Set Automatically option is enabled. This method will correct a few underlying problems, which is a worthy try.
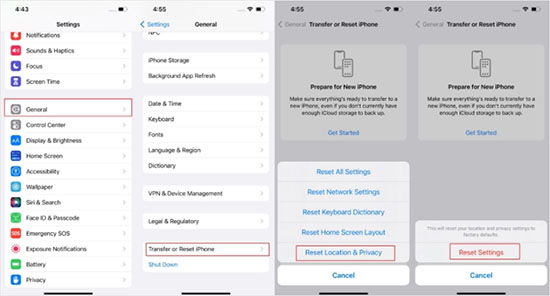
Method 8 Remedy Location & Privacy Settings
When your iPad is connected to a untrusted computer, a prompt will pop up on your iPad asking you to tap Trust this PC. However, if you accidentally choose the opposite option, Don't Trust, you are no longer allowed to do further steps with your iPad. One way to fix this problem is to reset location and privacy settings. Head to Settings, tap General, locate Transfer or Reset iPad, choose Reset, and select Reset Location & Privacy.
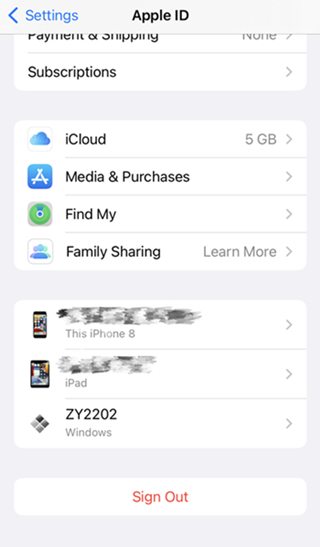
Method 9 Sign Out of and Re-sign In Apple ID
You may need to log out and log back into your Apple ID to refresh your account information if you have recently changed your Apple ID or password. Navigate to Settings still, tap Apple ID, and scroll down to the Sign Out button to log out. Then sign in with our Apple account again.
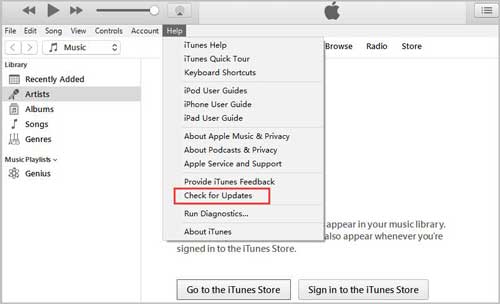
Method 10 Update or Reinstall iTunes
Another potential reason could be the outdated iTunes. So launch iTunes on your computer, find the Help section on the top bar, and click Check for Updates on the drop-down list. If your iPad remains unable to connect to iTunes after the update, try to delete this program and reinstall it.
Part 2. Fix iPad Won't Connect to iTunes via Joyoshare UltFix
After troubleshooting so many possibilities, if the iPad connection failure persists, it could be concluded that the iPadOS glitch is the culprit. But don't fret, Joyoshare UltFix is here to get you out of this trouble. The first feature that should be mentioned is the non-data-loss repair mode, which is called standard repair mode. With this program, you could fix more than 150 system errors on all Apple devices including but not limited to iPad stuck on connect to iTunes. As the foregoing information, it allows you to enter/exit recovery mode with only one click for free.
- Fix over 150 types of iPhone/iPad/iPod touch problems
- Standard repair system errors with no losing data
- Free to enter/exit recovery mode
- Downgrade iOS system to the previous versions
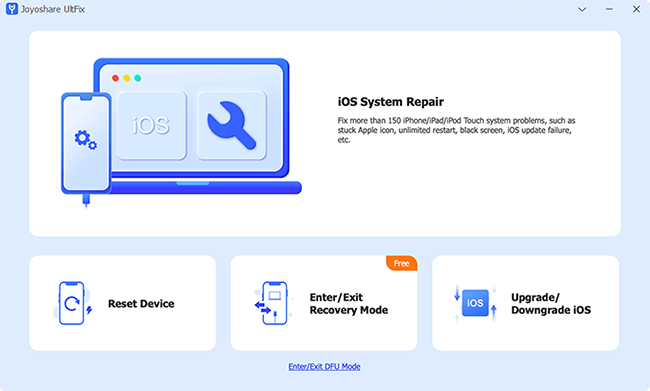
Step 1 Connect to Computer and Choose iOS System Repair
Plug your iPad into computer and run Joyoshare UltFix. Enter the iOS System Repair module, and click the Start button after previewing the information on the screen.

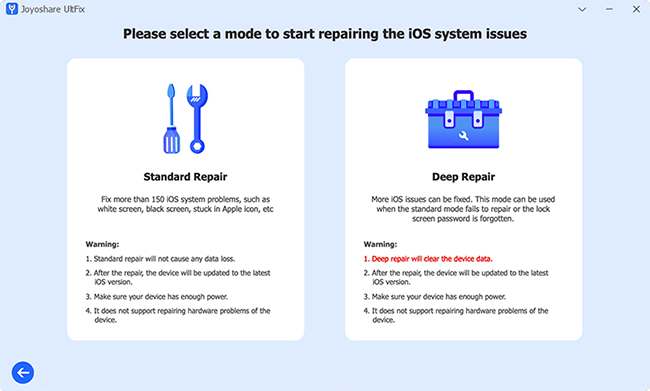
Step 2 Enter Standard Repair Mode
If your iPad is successfully detected by Joyoshare UltFix, select Standard Repair. However, if it cannot be recognized, put your iPad into recovery mode or DFU mode please.
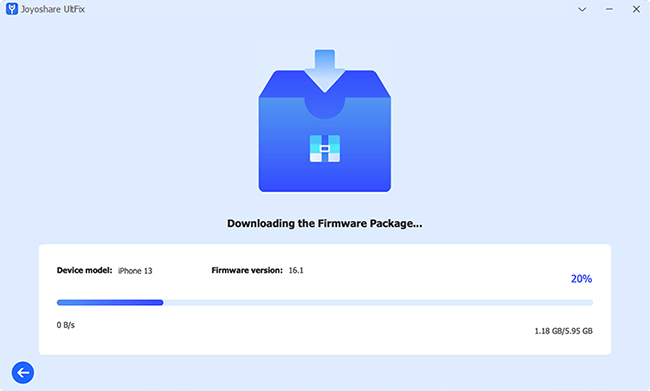
Step 3 Get Firmware Package
Your iPad information will be shown on the screen. Check and modify them if there is something wrong. Then click the Download button to get the matching firmware package.
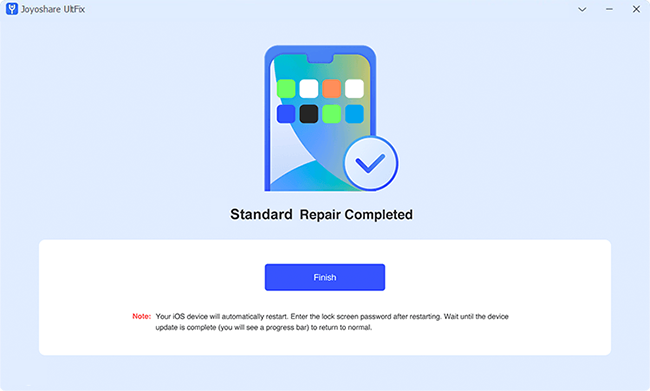
Step 4 Fix iPad Won't Connect to iTunes
Once the verification of the firmware package ends, click the Repair button to start fixing your iPad. When your device gets restarted, check if it can connect to iTunes.
Part 3. Reinstall Apple's Windows Driver
The final chance to repair your iPad by yourself is to reinstall Apple's Windows driver. This solution is harmless, so you can rest assured.
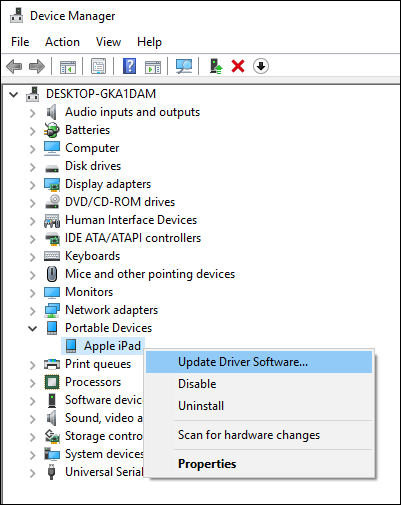
- Step 1. Connect your iPad to PC, and open the Start menu on your computer.
- Step 2: Search Device Manager and tap it.
- Step 3. Find Portable Devices and locate your iPad. Right-click the mouse and choose Update Driver Software.
- Step 4. In the pop-up, select Browse my computer for driver software, click Let me pick from a list of device drivers on my computer, choose Have Disk in the next screen.
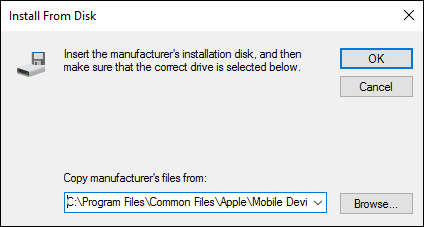
- Step 5. In the Install From Disk window, click Browse... under "Copy manufacture's files from:", and navigate to C:\Program Files\Common File\Apple\Mobile Device Support\Drivers, double click usbaapl64.inf. and click OK. Then, Apple's Windows driver is reinstalled.
Conclusion
Since there are 12 solutions offered in this article, you don't have to worry about your iPad won't connect to iTunes issue anymore. If you have done all these steps one by one, you will get to know which is the exact cause resulting in this annoying problem. Hence, if you figure out your iPadOS system is the trigger, at the meantime, you will discover that Joyoshare UltFix is a wonderful program to fix your problematic iPad. After following all the 12 methods your iPad still can't be detected by iTunes, you have to go to the local Apple Store asking for help.