AVS Video Editor has what it takes to create an exemplary video. Being that it supports Windows, many computer users find it an easy catch to work with on their PCs. It supports all key formats and will also process your video in high resolution like Full HD, 4K Ultra HD, and DCI 4K. You can record your video from a PC screen, create slideshows, and make your video look professional. Despite all these, you are likely to be taken aback by the watermark that your videos will bear. How to remove AVS Video Editor watermark is what you need to learn to create your content without a watermark.
- Part 1. Video Watermark Remover
- Part 2. Subscribe or Purchase License
- Part 3. Find Crack
- Part 4. Crop and Trim Watermark
- Part 5. FAQs about AVS Video Editor
Part 1. Joyoshare VidiKit - Best AVS Video Editor Watermark Remover
Joyoshare VidiKit is a magical watermark remover and maker for both your videos and images. It works at a fast speed to support the editing of the watermark for multiple videos. You can also preview the results in real-time and make visualized comparison. The advanced mode it offers even permits you to cut videos into different segments and mark wherever watermark locations to efficiently get rid of. It's worth noting that this software outputs files to extensive formats including general video, web video, HD video and devices like iPhone, Xbox and more.

- Support many output formats like MP4, HD MOV, YouTube, 4K
- Batch watermark removal in multiple videos
- Easily adjust your video parameters such as resolution
- Set quality and preview results in advance
- Erase watermarks from videos and images
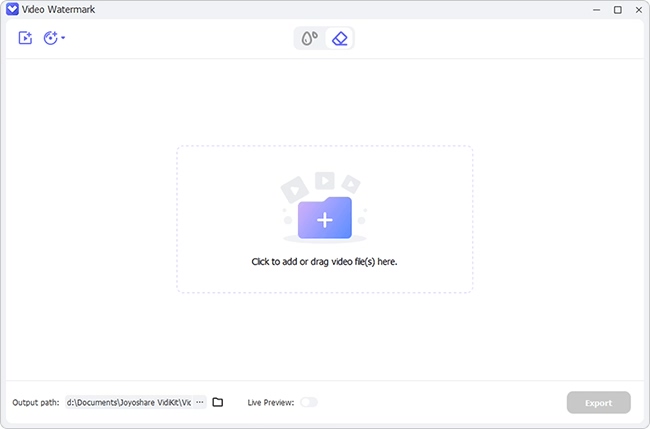
Step 1 Add videos to Joyoshare VidiKit
Once you download and install Joyoshare VidiKit on your computer, move on to launch. Then run "Watermark Wizard" and go to the "Remove watermark from video" option in the main interface. Next, drag and drop your video files to the program to add them.
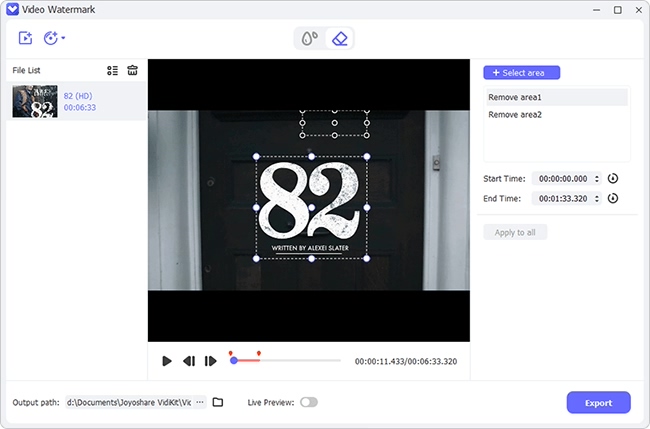
Step 2 Select watermarks in videos
Highlight your video and then use the mouse to select the region that bears the watermark. You can click on "Advanced" option, which looks like a tool to cut video. Then click "+" to add segments and select watermarks to mark. This helps you remove multiple watermarks from one video at the same time.
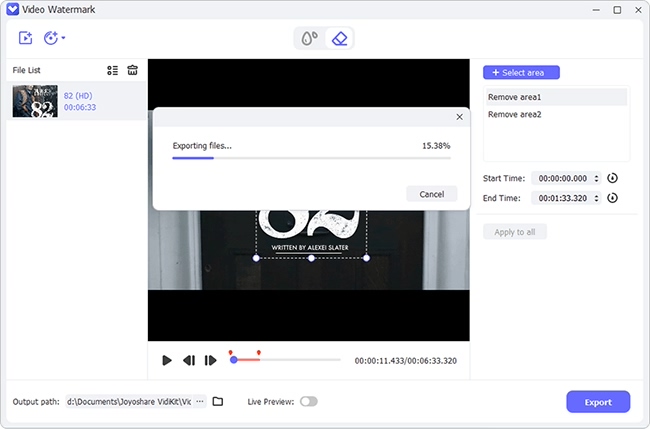
Step 3 Output videos without watermarks
Finally, Joyoshare VidiKit will erase the watermark from your video. You can set other preferences by clicking the "Format" tab and then choosing the desired format and quality. Likewise, adjust the output location and hit the "Output" button to export your videos to any media platform without watermarks.
Part 2. Subscribe to Remove Watermark in AVS Video Editor
Purchasing an activation key is another quick way to remove the watermark from AVS Video Editor. Even though it is expensive, you will free yourself from looking for watermark removal tools. It now officially provides 5 professional multimedia programs in one package. You can choose the yearly basis of $49 or buy a one-time unlimited license at $79.

- Step 1: Visit the AVS Video Editor site.
- Step 2: Choose the upgrade subscription option by clicking the "Buy Now" tab.
- Step 3: There are two options of access subscriptions to choose from. So, click on either the "1 year" or the "Unlimited" option.
- Step 4: Finally, choose your mode of payment and check out.
Part 3. Find Crack
Before you attempt this method to get rid of watermark from AVS Video Editor, you should note that cracking software is not legit. It's risky and will easily carry potential virus to your computer. Also, the program you use may crash often or has possible errors to run. However, you can opt to use it and evade the buying of a license.
- Step 1: First, download the AVS Video Editor.
- Step 2: Next, download "Crack files" from this link "AVSVideoEditor.exe – C:\Program Files\AVS4YOU\AVSVideoEditor".
- Step 3: Then install AVS Video Editor on your computer.
- Step 4: Next, extract all the files from the "Crack File" that you had downloaded.
- Step 5: Open the "Task Manager" and close all the processes of the AVS Video Editor.
- Step 6: Finally, copy and replace the watermarked file with the "Video Editor" link you used before.
Part 4. Crop and Trim Watermark
Cropping and trimming is another easy method of removing watermarks from AVS videos. Without affecting the overall viewing effect of the video, you can follow these steps to edit your video with AVS Video Editor.
- Step 1: First, import your video clip into the timeline of any video editor.
- Step 2: Next, right-click on your video clip then go to the menu section or available places to find Crop or Trim tools.
- Step 3: Finally, you can move the slider to cut out video clips with watermark or start to crop the selected region that you had selected.
Part 5. FAQs about AVS Video Editor
1Does AVS Video Editor have a watermark?
Yes, AVS Video Editor has a watermark. This is visible from the "Video Overlay" panel that shows on the screen. You can choose to change the size of the watermark as well as its position on the screen. However, you need to subscribe with license to remove it.
2How to add a watermark in AVS Video Editor?
AVS Video Editor has state-of-the-art technology to help you patent your work. You can add a logo, image, or personalized text to your video with this app.
- Step 1: Import your video clip and add it to the AVS Video Editor Timeline. Click on the "Media Library" and choose the "Images" section and then click the "Import" option.
- Step 2: Then drag your file into the appropriate track and drop it in the location of choice. You can also adjust the duration of the watermark and move it to another position on the "Video Overlay" track.
- Step 3: Use the "Edit Overlay" icon to apple other overlay features. These include adjusting your video's location and size. Likewise, you can change the watermark's transparency in the "Edit Overlay" section.
- Step 4: Finally, when all edits are done, click on the "OK" button to apply the effects to your video. AVS Video Editor allows you to export your video on other media platforms. So, save it and export your video with a watermark as a sign of ownership.
Conclusion:
For those who don't know how to remove watermark from AVS Video Editor, this article has just solved your agony. You are now fully equipped to remove the watermark in various ways including purchasing license, cracking software, cropping, and leaning on the best watermark remover, Joyoshare VidiKit. The app lets you preview your files and even share the output on several media platforms. Nonetheless, you can opt to watermark your videos for patenting among other benefits. Still, AVS Video Editor has you at heart. Use it to add a watermark to your video and make any needed adjustments as well.
