Video conferences hosted by CyberLink U are essential for both professional and academic settings. You can instantly attend a meeting using any U app on your computer or phone. Within the context of the U app, recording a CyberLink video conference is also permitted. Users can record CyberLink U Meeting to archive, share, and replay the sessions. If you still have no idea to utilize the feature in CyberLink U Meeting to record a conference or find no way as an alternative, then you might as well check what we show in this article.
- Part 1. What Is CyberLink U Meeting
- Part 2. Record with Inbuilt Recording Tool
- Part 3. Record with CyberLink U Meeting Recorder
- Part 4. FAQs about CyberLink U Meeting Recording
Part 1. What Is CyberLink U Meeting?
The video conferencing service known as CyberLink U Meeting is hosted in the cloud and allows users to host online webinars and video meetings. It offers apps compatible with Windows, macOS, Android, and iOS in that order. Therefore, users can attend a conference at any moment using either their computer or their mobile device. The service is offered in four different plans, the most basic of which is free to use for up to 30 minutes every conference and supports a maximum of 25 users simultaneously.
Part 2. Record CyberLink U with Inbuilt Recording Tool
As was just discussed, CyberLink comes equipped with an in-built video meeting recorder that makes it simple for you to record CyberLink U Meeting. You are free to use the CyberLink U app on your Windows computer, Mac, or any device running Android or iOS. In addition, you can participate in a video conference hosted by CyberLink using Chrome. Nevertheless, note that this recording feature is only supported for Windows version of U Meeting.
Step 1: Launch the CyberLink U Meeting app on your device, log in to your account, and join a meeting room.
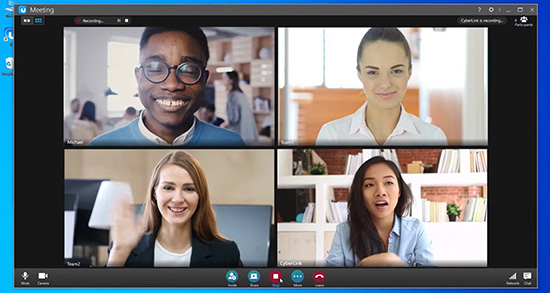
Step 2: You should now be able to notice that a Record button has appeared in the middle section of the bottom toolbar.
Step 3: You can Start Recording this video conference or distance learning session by clicking on it.
Step 4: When you use CyberLink U Meeting to record a video conference, all participants will get a notification informing them that the recording is being made.
Step 5: When it is time to wrap up the online meeting recording, all you have to do is press the Stop button on your recording software.
Step 6: After that, you can find the previously recorded CyberLink U Meeting by selecting the Open file location from the menu that appears.
Part 3. Best Way to Record CyberLink U Meetings without Limit
The screen recorder that is bundled with Joyoshare VidiKit can record anything that is shown on the desktop screen, including the video, sounds from system, and voice from microphone. People who want to record what is going on their screen while gaming or studying will find that this screen recorder is the best option available. This advanced video software gives you maximum freedom to select areas, highlight cursor, show mouse-clicking, schedule task, and more. Best of all, it has unlimited recording duration and no-latency recording to greatly improve your user experience.

- Record both screen and audio simultaneously without any degradation in the quality
- Set no limitation on the recording duration
- Allow users to change resolution, frame rate, codec, channel, and more
- Support outputting recorded files to different formats
- Record meetings from Zoom, CyberLink U, Amazon Chime and the like
Step 1 Enable Screen Recorder
Download and install Joyoshare VidiKit program on your PC. Open this video toolkit and find Screen Recorder for launch. You’ll start under "Record video and audio" mode.

Step 2 Set Capture Area for Recording
In the lower right-hand corner of the recording area, you will see a symbol that looks like a plus sign. Prepare a meeting in CyberLink U Meeting in advance and the capture area will display on your screen as soon as you click on this button, making a fittable recording region by adjusting it.

Step 3 Check Recording Options
Simply click on the "Options" button, which looks like a gear, to check more settings for your recording, such as output format, shortcuts, highlight effects, watermark, etc.

Step 4 Record CyberLink U Meeting
Start your meeting and you can record videos in excellent resolution after clicking on the REC button. It’s workable to take screenshots at any time, pause or cut recordings by pressing the buttons that correspond to that function.

Step 5 Manage Recorded Meeting Video(s)
Your meeting recording will be finished once you click on the Stop button. Soon after, a pop-up window called History will appear that lists your recorded files, enabling you to preview, edit and rename.

Part 4. FAQs about CyberLink U Meeting Recording
1 How to Record U Meeting on iPhone/Android?
You can record a U Meeting on a mobile device using built-in screen recorder or recording feature, resorting to a third-party screen recorder program, such as AZ Screen Recorder, or applying a desktop recording tool to record U Meeting by projecting your screen onto the computer.
2 How to disable CyberLink U Meeting recording feature?
Simply selecting the Settings button inside the meeting room and unchecking the box next to the Allow Recording option will simplify you to turn off the feature that records meetings.
3 How can I record CyberLink U Meeting secretly without notifying others?
You can secretly record a video conference on U Meeting using Joyoshare VidiKit. It is a quality yet dedicated software that can comfortably help you do that.
Conclusion
This article goes through two different methods for you to record CyberLink U Meeting. The native capturing feature is only accessible in the application for PC. Joyoshare VidiKit provides access to a broad variety of supplementary tools for meeting capture. Aside from them, you’re suggested to use online recording tools to quickly initiate meeting recording if you prefer no downloading and installation.
