This world has gradually recovered from the epidemic, but with different epidemic prevention policies in each country and a feeble airline industry which has yet to return to full strength, people sometimes have no choice but to deal with business entirely online. MediaSite, a video platform involving multifarious features, rises in response to the proper time and conditions. If you think of MediaSite as an octopus, MediaSite Desktop Recorder, today's leading role, is one of its tentacles. We have made an introduction about the product MediaSite and a guide on how to use it, with the addition of one best alternative in case you have other preferences to the best of our abilities.
- Part 1. What is MediaSite
- Part 2. How to Use MediaSite Desktop Recorder
- Part 3. The Best Alternative of MediaSite
- Part 4. FAQs of MediaSite Desktop Recorder
- Part 5. Conclusion
Part 1. What is MediaSite
# An Introduction to MediaSite
As we have mentioned above, it will be best to call it MediaSite Video Platform. With its extensible system, users who generally come from organizations like schools and enterprises is able to create, publish, manage their videos. We hold the point that it integrate two kinds of product, one is for initiating online meetings or webinars, the other is for handling videos. They intend to engage their customers by putting a collection of functions into one box for increasing chance of winning. According to this line of thought, it doesn't take much imagination to guess that this software contains functions including create, share, edit, stream, collaborate and review your videos, as well as provide a data analysis of video performance, not to mention a consideration embodied inside -- video protection which is important for enterprise to defend commercial confidential.
# MediaSite Desktop Recorder Review
MediaSite Desktop Recorder is derived from MediaSite. As a popular video and audio recording tool, it allows us to record any activities happening on our screen. An easy-to-use video capture environment with a streamlined and familiar interface fosters strong usage intention no matter where users record from. You can record videos from your personal computer, flat computer, or mobile phone at any time you want, let alone upload them to the cloud disk and social media, it can be done by just moving your fingers.
Part 2. How to Use MediaSite Desktop Recorder
You may ask how can I record video using my MediaSite Desktop Recorder, it's not always easy when people are facing some computer programme or software. But don't worry, here are detailed procedures.
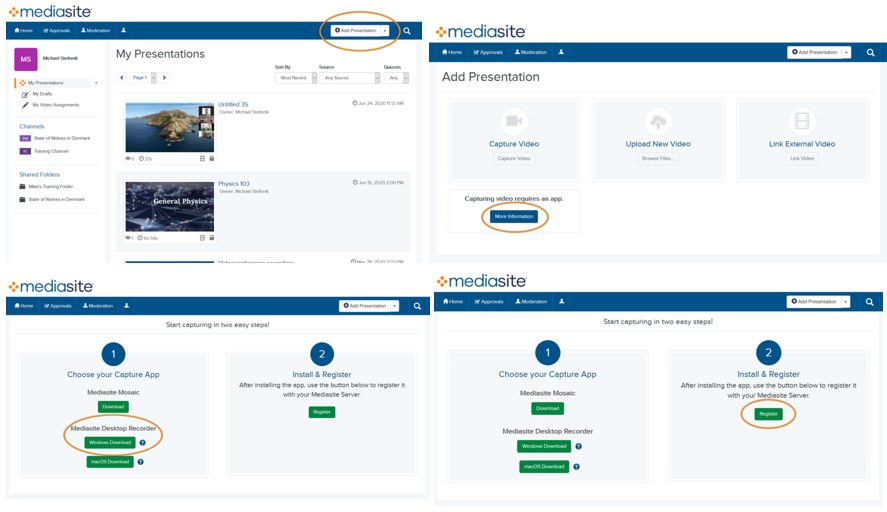
Step 1: Download and register MediaSite Desktop Recorder
MediaSite Desktop Recorder download is better to happen on its official website otherwise you may be cheated by some software garbage. Firstly, click "Add Presentation" next to the magnifying lens icon at the top right corner. Then move to the box named "Capturing video requires an app", and tick "More information". Then there will be several green rectangles you can press, and choose the one under MedSite Desktop Recorder. After the installation, go to the registration module to successfully log onto your account.
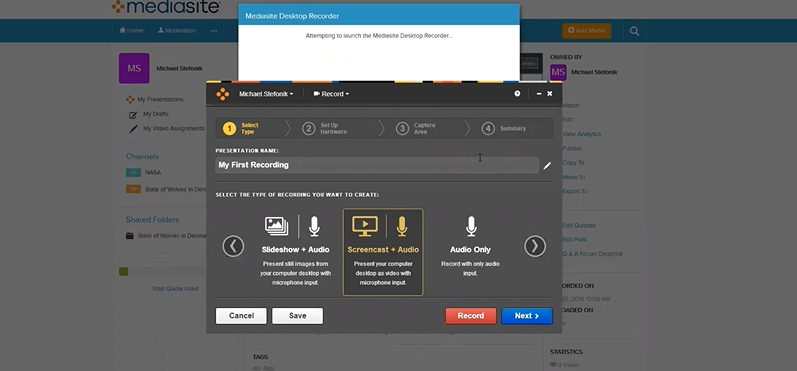
Step 2: Choose the type of recording
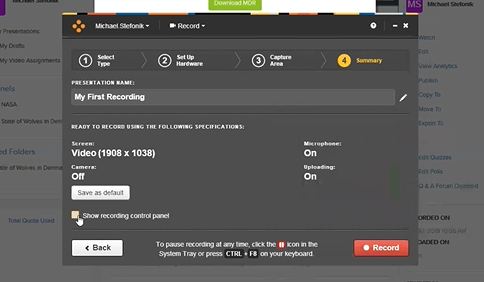
On the main interface, there are several choices to select. You can choose "Slideshow + Audio", "Screencast + Audio" or other types you like according to your needs. Don't forget to input the name of your recording on the blank bar. Then click "Next" to move to the next step.
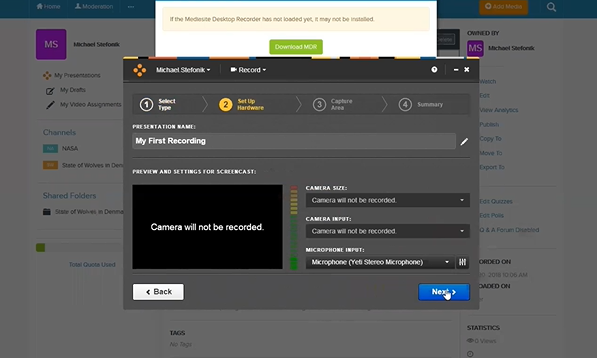
Step 3: Change the settings for screen-cast
There are three settings, camera size, camera input, and microphone input. If you are going to record your screen, then no camera would be used. But if any of them should be engaged, please select the one that you will use to record, the microphone ditto.
Step 4: Delimit the recording area

Step 5: Start your recording
Tap on "Show recording control panel" for better operating during recording.
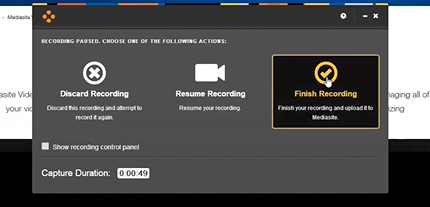
Step 6: Finish your recording
After you click "Finish Recording", your video will be automatically uploaded to MediaSite. Once processing is complete, your recording will be available in your MyMediasite portal. Review the finished recording.
Part 3. The Best Alternative
There are many alternatives to MediaSite Desktop Recorder in the market. Not hard to see that MediaSite belongs to those which have a complicated operational process. Thus it's necessary to allow its best alternative -- Joyoshare VidiKit.
- No watermark on your final video
- Customize your recording area
- Edit your video with powerful functions after recording
- Support a plethora of output formats
- Record WeChat video call, Vimeo video, meetings and more
# An Overview of Joyoshare VidiKit
Joyoshare VidiKit is a powerful and comprehensive video processing software. Equipped with various functions such as video cutting, screen recording, video converting, video repairing, etc, Joyoshare VidiKit is more like a tool kit than a simple recorder. It provides one-stop service to those people who would like to re-edit the recorded videos for operating within one software. No matter what kinds of video you are going to save, this toolkit could totally satisfy your needs.
# Operating Approaches
Joyoshare VidiKit is capable of taking the place of MediaSite Desktop Recorder in your heart. Here come the steps. You will find that with the same number of steps, the applying method of Joyoshare VidiKit is much more clear and easier.
Step 1. Joyoshare VidiKit's installation and registration
Step 2. Launch screen recorder
- Go to "Record" in the menu on the left and press "Screen Recorder". Then it will pop up a window like this.

Step 3. Set recording preferences

Step 4. Select the recording range

Step 5. Start your recording

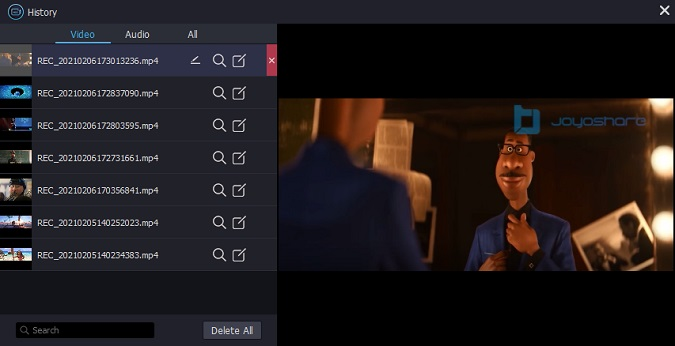
Step 6. Find the recorded videos and preview them
Part 4. FAQs of MediaSite Desktop Recorder
Q1. Why won't my MediaSite video upload?
A: The most common issue is that your desktop application is not registered. Sometimes it's because your system is not connected properly to the Internet. Or some users have changed their default settings and unchecked "Upload files while recording". Make sure this option is checked.
Q2. How to screen record on a Mac?
A: Joyoshare VidiKit is compatible with both Windows and ios systems. You can visit the official website to download it.
Q3. Can I upload a recording I made offline with the Mediasite Desktop Recorder?
A: Yes. If you recorded a video offline using the Mediasite Desktop Recorder, you can easily upload your video. Follow the step-by-step instructions to upload an existing desktop recording to a new presentation in MediaSite.
Part 5. Conclusion
MediaSite is a powerful video platform that consists of various functional elements including MediaSite Desktop Recorder. It can record your screen or record your face with the camera on your computer. But it's a little bit difficult to use for its laborious interface. Thus we highly recommend Joyoshare VidiKit. You can be familiar with it quickly and enjoy the most concise operating experience. Let's have a try and you won't regret it!
