FaceTime is a platform for people to make video and audio calls from iOS devices to Mac computers. It eases millions of people's feelings of homesickness who live far away from their hometowns, helps them connect with their friends and families, and even has become a critical element of business communications. More and more people take advantage of it and rely on it heavily. But do you wonder how to record FaceTime calls? How to save important business meetings or other significant video chats you are going to have on FaceTime? Now the all-round article will show you how to record it or take screencasts on iPhone, iPad, and Mac without any hassle.

- Part 1. Best Way to Record FaceTime on Computer - Joyoshare VidiKit
- Part 2. More Screen Recorders to Record FaceTime Call on Mac
- Part 3. Record FaceTime Video on iPhone and iPad
- Tips. How to Take Screenshots on FaceTime on Mac/iPhone/iPad
Part 1. Record FaceTime on Computer - Joyoshare VidiKit
You can rely on Joyoshare VidiKit (upgraded from Joyoshare Screen Recorder) to record any video or audio from any source, such as video calls on Skype, Facebook, Tango, WhatsApp, etc. online meetings, streaming music, gameplay, and more. Besides, you are able to save them in MP4, MKV, AVI, FLV, HD video, 4K video, etc. into all models of iPhone, iPad, smart TVs, etc. This app will enable you to record screen with audio in high quality. No watermark, no time limit and no latency at all.
Joyoshare VidiKit is equipped with a package of flexible features. You are allowed to brand videos by inserting image watermark, set start/end time of your recording tasks manually, highlight mouse movement, grab recording area of any size as you like, etc. Run program > adjust settings > select capturing size > start to record. Just 4 simple steps are needed so that you can save precious conversations with your friends and families on FaceTime for good.

- Real-time capturing of FaceTime videos and audio with no watermark
- Support recording audio detected from microphone and computer system
- Customize and edit FaceTime videos and audio using various tools
- Adjust output format and its frame rate, bitrate, codec, resolution, etc.
- Record video calls on Skype, WeChat, Whatsapp, Facebook, and more
- Compatible with MP4, MOV, FLV, MPEG, 4K video, etc. and many devices
Step 1 Open FaceTime
Launch FaceTime in advance on your Mac. Get ready to record a coming FaceTime video call.
Step 2 Download and Install Joyoshare VidiKit
Follow the on-screen instructions to install Joyoshare VidiKit after downloading it, then run it and open the screen recorder on the "Record" panel. Please remember to click the
 icon near the "REC" button so that you can record FaceTime with audio. Of course, if you only want to record FaceTime audio, you can tap the
  icon instead.
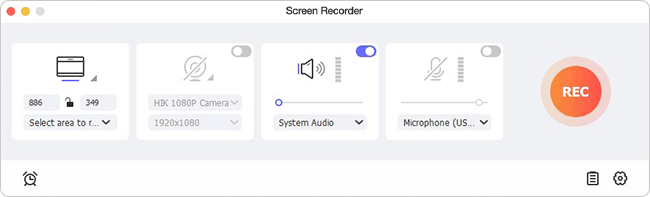
Step 3 Customize Recording Settings
Go to the gear icon near the
icon. Click it and you will see there are three options on the unfolded window. Feel at ease to set your output format, change shortcut keys, add a logo, schedule the recording, highlight cursor/clicks in your own style, etc.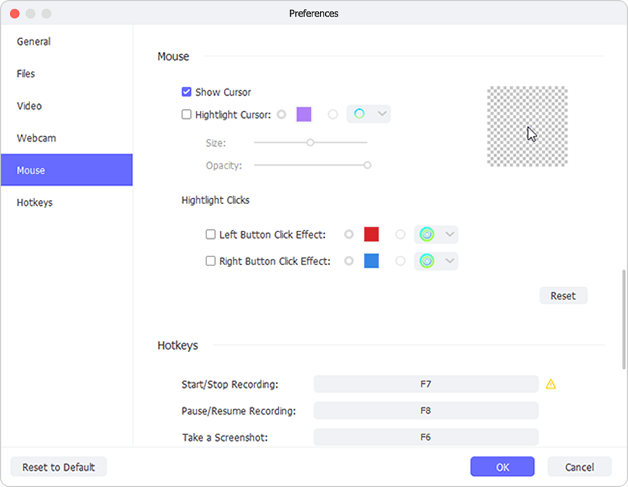
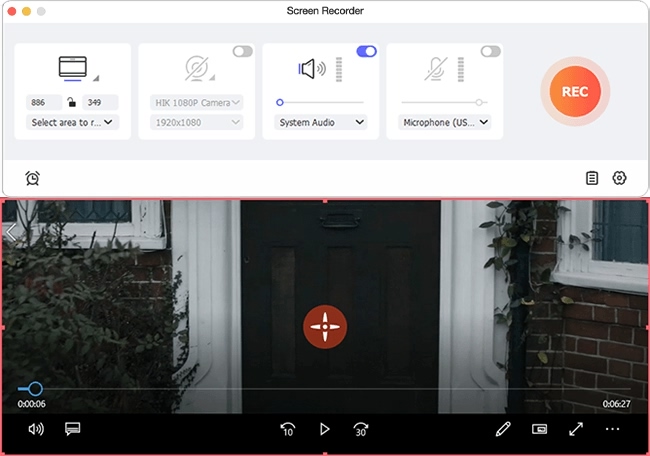
Step 4 Record in Full Screen or Partial Screen
You can see a "+" icon on the Capture Area section of the screen. Click it to grab your preferred recording area using the capture frame. Apart from that, you are also able to press the small triangle icon nearby and choose from a list of resolution standards.
Note: You can also adjust the weight and height and lock the aspect ratio so as to select your capturing area more precisely and accurately.
Step 5 Begin to Record FaceTime with Audio
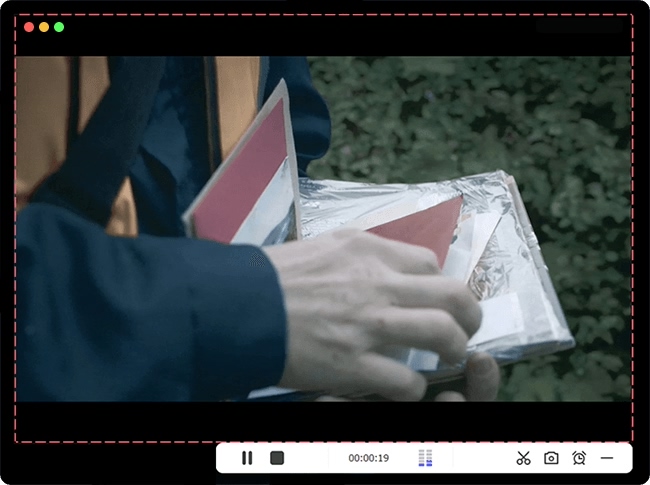
Enable system audio and/or microphone on your Mac if necessary. When everything has been prepared well, press the "REC" button to start to record FaceTime video calls. When the minimized toolbar shows up, you are free to click the "Cut" icon to split recordings. Press the "Stop" button to finish recording when you end your FaceTime video chat. Finally, you can manage and edit them in the History library.
Part 2. More Ways on How to Record FaceTime with Audio on Mac
QuickTime Player
QuickTime Player, which is usually pre-installed on Mac, is often used to play videos and take screencasts. Additionally, it is also a super simple way for users to record a FaceTime call on computer. After recording, you are free to open the FaceTime video in the app and save it on your Mac. To begin with, you can open QuickTime from your Applications folder.
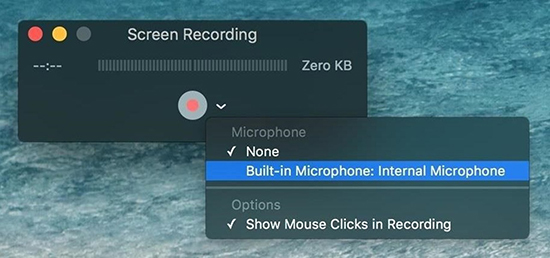
- Step 1: Launch QuickTime on your Mac and go to the menu bar and choose File > New Screen Recording to start a recording task;
- Step 2: Press the down arrow button near the record button to change many recording settings like "Internal Microphone", "Show Mouse Clicks in Recording", etc.
- Step 3: Tap the record button now, and after that, you can either click anywhere on the Mac screen to record FaceTime video in full screen or drag to select an area, then click Start Recording to begin the recording;
- Step 4: Click the Stop Recording button in the menu bar or press Command-Control-Esc to stop recording FaceTime.
- Step 5: QuickTime will open your FaceTime video call recording automatically after you stop recording, and you will be able to play, edit, and share your files.
-
Shift + Command + 5
Shift, Command, and 5 can be used together to open the Screenshot toolbar, which can be applied to solve the problem of how to screen record FaceTime with sound. When opening the toolbar, you will see a series of online controls, which will allow you to record the entire Mac screen, grab screen of any size, or even capture a still image of your FaceTime screen. Using the Screenshot toolbar is easy.

- Step 1: In order to record FaceTime in Full screen, you need to click the
 icon, then click any screen to start recording; you can hit the
  icon to stop recording FaceTime call;
 - Step 2: If you need to record a customized area of your Mac screen, you can press the
 icon and then drag to grab an area to record; you can tap "Record" in the onscreen controls to begin to record FaceTime and the icon to stop recording;
 - Step 3: After recording, a thumbnail of your created FaceTime video will appear and you can choose to trim, edit, and share your FaceTime video with audio.
- Step 1: In order to record FaceTime in Full screen, you need to click the
Wondershare DemoCreator
Wondershare DemoCreator is easy to download and install on Mac. With a user-friendly interface and coming with a wide range of useful tools, this app will allow you to carry out FaceTime record in a fast and easy manner. Moreover, with the help of this program, you are also capable of record FaceTime call with system audio and microphone voice. Wondershare DemoCreator has a bundle of editing tools as well, which will enable you to edit FaceTime videos professionally and quickly.
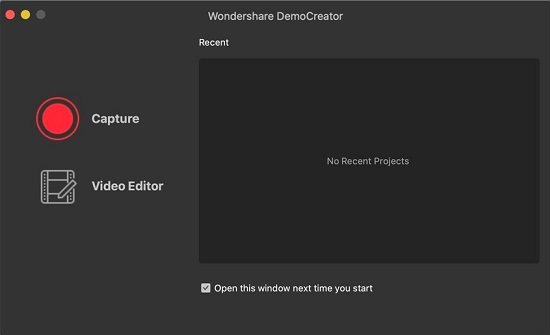
- Step 1: Open DemoCreator on your Mac, then select "New Recording";
- Step 2: You can drag the capture frame to select the area of your FaceTime video call;
- Step 3: You are also able to adjust the "Recording Device" and enable the "Screen Drawing Tool" if necessary;
- Step 4: When you are ready, you can press the red record button to start to record a FaceTime call with audio.
-
Aiseesoft Screen Recorder
Aiseesoft Screen Recorder is a reliable video call recorder on Windows and Mac. It is able to record screen with audio, so you can use it to record FaceTime video calls easily. Similarly, you are able to use this video recorder to save online videos, record gameplay for sharing, download music, make how-to videos, etc. It is able to create high-quality videos smoothly. In addition to that, Aiseesoft Screen Recorder supports video editing as well.
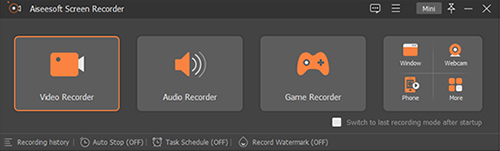
- Step 1: After running Aiseesoft Screen Recorder on your Mac, you can select the "Video Recorder" option to enter the screen recording interface;
- Step 2: You can begin to adjust a series of recording settings options, such as recording area, recording inputs, etc.; more options are accessible by clicking the gear icon near the REC button;
- Step 3: Finally, press the REC button to start recording FaceTime on your computer, and your video will be saved in the format you choose.
Part 3. How to Record a FaceTime Call on iPhone/iPad
Perhaps you are more accustomed to using iPhone or iPad to make FaceTime video calls. In fact, you can find a built-in screen recorder in iOS 11 or later, and iPadOS. It is totally free and expects no extra third-party app.
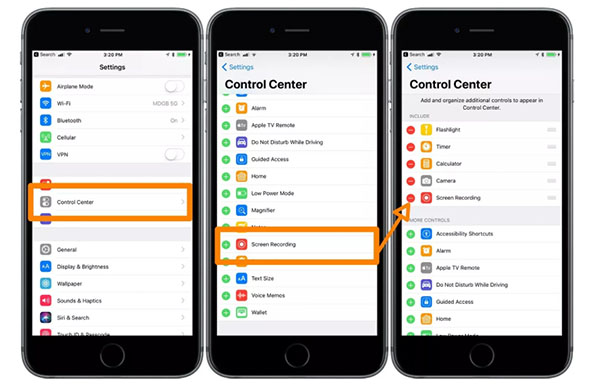
- Step 1: Enter the Settings app on your iOS devices;
- Step 2: Select Control Center option and scroll down to find Customize Controls;
- Step 3: Tab the "+" icon next to Screen Recording to add it to your iPhone or iPad control center;
- Step 4: Open FaceTime and swipe up from the bottom of the screen (swipe down from the upper-right corner for iPhone X or later or iPad with iOS 12 or later, or iPadOS);
- Step 5: Search for Screen Recording icon and tap on it, and then your iPhone or iPad will begin to record after a 3-second countdown;
- Step 6: Either the open control center to press the Screen Recording button or tab the appeared red timer of your iOS screen to stop recording, and finally, you can go to the Photos app to check your captured FaceTime video calls.
Tips. How to Take Screenshots on FaceTime on Apple Devices
This part intends to help you when you prefer to take a screenshot rather than record a whole video call on your Mac, iPhone or iPad.
a. Take a screenshot on Mac
When using Joyoshare VidiKit (originated from Joyoshare Screen Recorder), you can click the gear icon near the ![]() icon to open the Settings window at first. Next, press the "Shortcuts" button and choose "Take A Screenshot", then adjust the keys below. By doing so, you will be able to take screencasts at any time during your FaceTime recording.
icon to open the Settings window at first. Next, press the "Shortcuts" button and choose "Take A Screenshot", then adjust the keys below. By doing so, you will be able to take screencasts at any time during your FaceTime recording.
Note: You can open the Menu button at the top of the main screen and select Preferences. Choose the Convert panel so that you can check the location of your screenshots. You are allowed to change your save path as well.
b. Take a screenshot on iPhone
For iPhone with Face ID, you need to press the Volume Up button and the Side button at the same time and then release them quickly.
For iPhone with Side button and Touch ID, you are supposed to simultaneously press and then release the Home button and the Side button.
For iPhone with Top button and Touch ID, you are ought to simultaneously press the Home button and the Top button and then do a quick release.
At that time, a thumbnail will be shown in the lower-left corner of your iPhone screen for a short while. You can tab it to open it or just ignore it.
c. Take a screenshot on iPad
For iPad with Face ID, you need to press the Top button and the Volume Up button together and then release them quickly.
For iPad with Home button, you can press the Home button and the Top button at the same time and then release them rapidly.
Then a thumbnail will appear in the lower-left corner of your iPad screen. Tap it and then press Done. If you choose to save your screenshot, you can find it in the Screenshots album in your Photos app.
