Q: "I have completed a series of interviews on Voice Memos. I'd like to combine them into one memo. Is that possible natively?" - From Apple Community

The Voice Memos app on iOS devices is an excellent tool for recording lectures, interviews, and quick musical ideas. However, many users quickly discover a frustrating limitation: Apple's native Voice Memos app does not have a built-in "Merge" button.
If you find yourself with multiple short audio clips that need to be stitched together, don't worry. Whether you want to compile lecture notes or join interview segments, learning how to combine voice memos is highly achievable using alternative methods. This comprehensive guide will walk you through the most effective ways to merge your recordings directly on your iPhone, transfer them, and edit them on a Mac or PC.
- Part 1. How to Merge Voice Memos on iPhone
- Part 2. How to Transfer Voice Memos from iPhone to Computer
- Part 3. How to Join Voice Memos Together on Mac and PC
- Part 4. How to Combine Voice Memos Online
Part 1. How to Combine Voice Memos on iPhone
Combining voice memos on the iPhone is in high demand. In this section, we'll explore native solutions that don't require additional devices, including iMovie and GarageBand. For those seeking an even simpler approach, third-party apps such as Merge Voice Memos provide a straightforward alternative. Let's take a close look.
Method 1. iMovie
While best known for video editing, iMovie's versatile timeline makes it equally powerful for combining voice memos. As a free, pre-installed app on your iPhone, it offers a familiar interface that simplifies the merging process. This means you can achieve professional-level audio combining without downloading additional software.
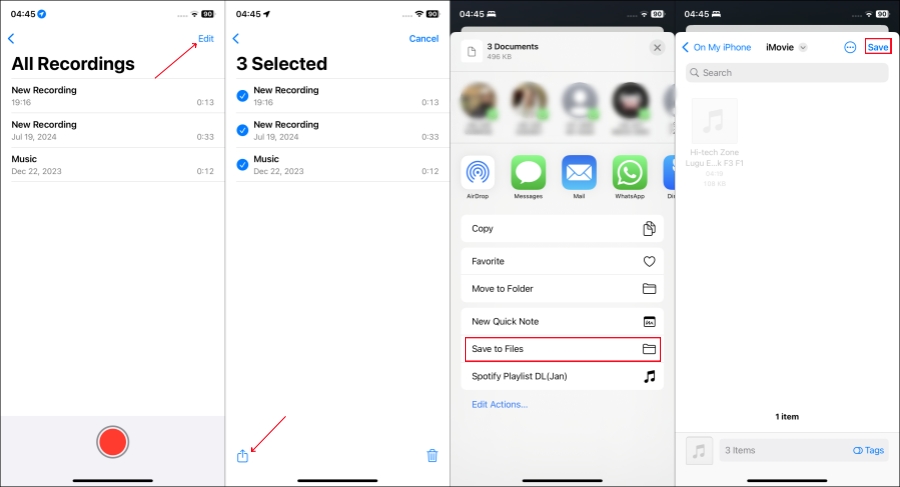
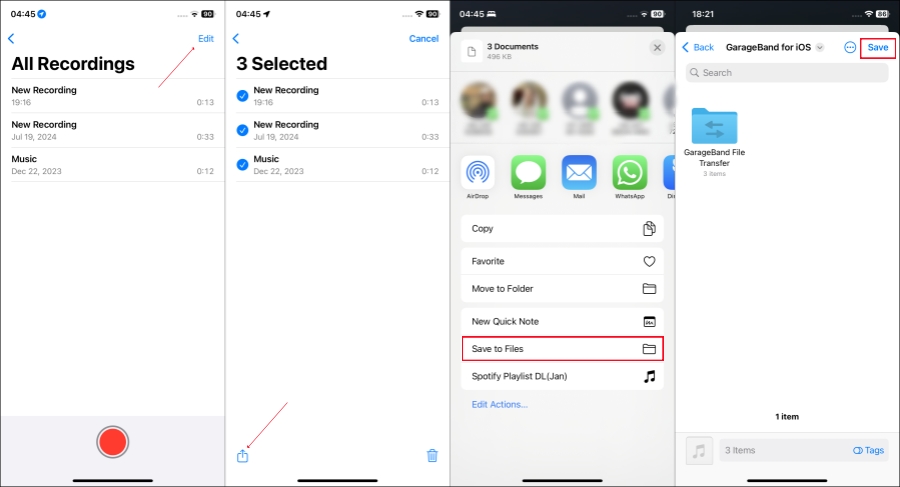
- Step 1: Open Voice Memos app on your iPhone. Simply tap All Recordings → Edit to select desired voice recordings. Now tap the Share button at bottom left and choose Save to Files option. You can then search iMovie to select iMovie folder and tap Save.
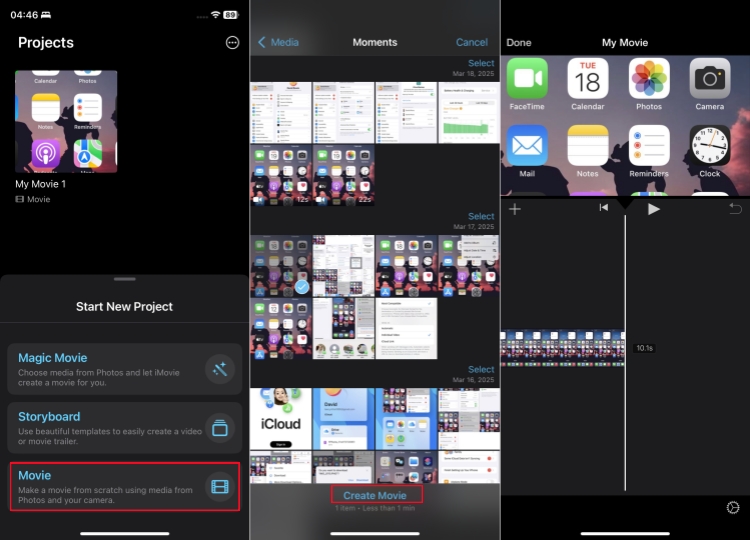
- Step 2: Launch iMovie on iPhone and tap Start New Project → Movie. Then select any image or video and tap Create Movie at the bottom to successfully import media file(s).
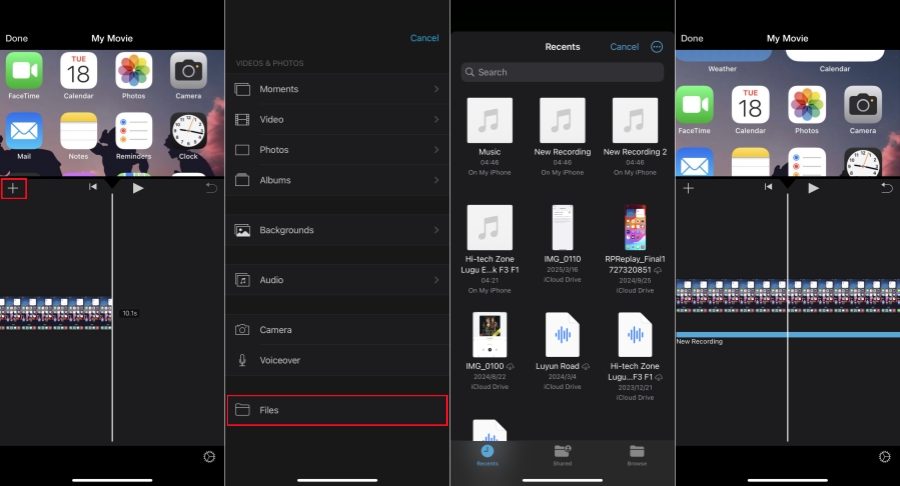
- Step 3: Tap the "+" and then Files to add one voice memo to the audio track in iMovie. Repeat the same operation to add two or more recordings. Based on your needs, trim recordings or adjust the order.
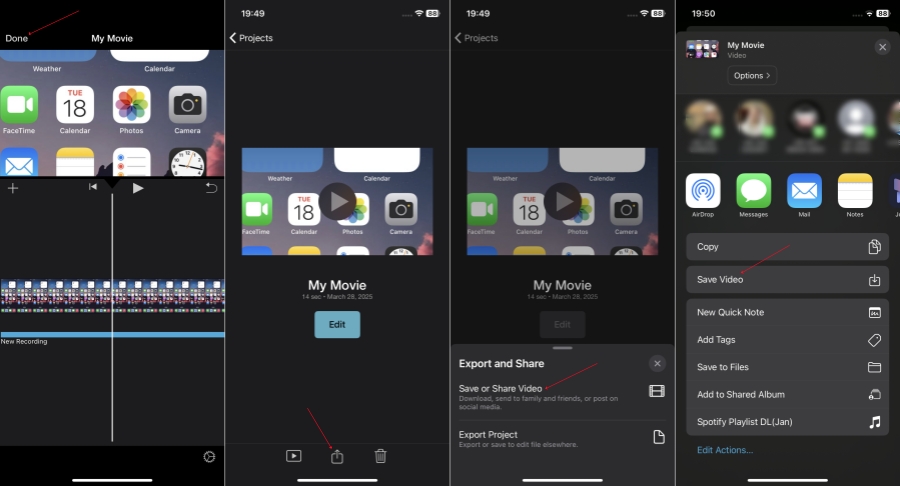
- Step 4: Simply tap Done → Share → Save or Share Video → Save Video to export your video along with combined voice memo to your Photo Library.
Method 2. GarageBand
Beyond music creation, GarageBand serves as a free, powerful, and built-in solution for combining multiple voice memos into one on iPhone. This versatile audio workstation not only merges recordings with high quality but also enhances them with professional effects, EQ filters, and multi-track precision. New to GarageBand? Our step-by-step guide below will show you how it works.
- Step 1: Open Voice Memos app on your iPhone. Go to All Recordings → Edit to pick up wanted recordings. Then tap Share → Save to Files → GarageBand File Transfer under GarageBand for iOS folder to Save all selected voice memos.
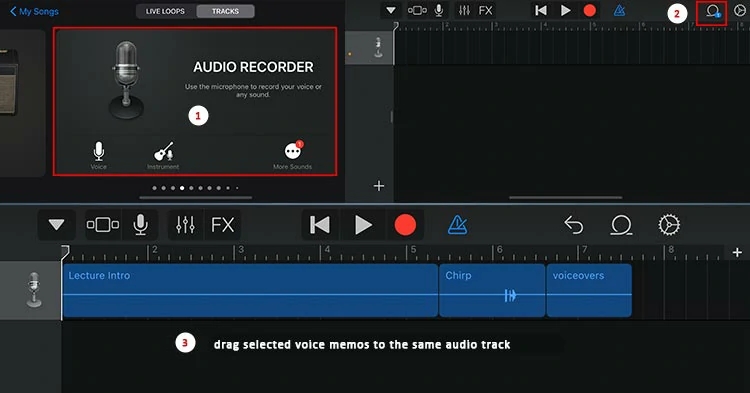
- Step 2: Launch GarageBand on iPhone and tap Audio Recorder to open the audio editor. Afterwards, tap the icon at the upper right corner to drag and drop all voice memos to different or the same audio track.
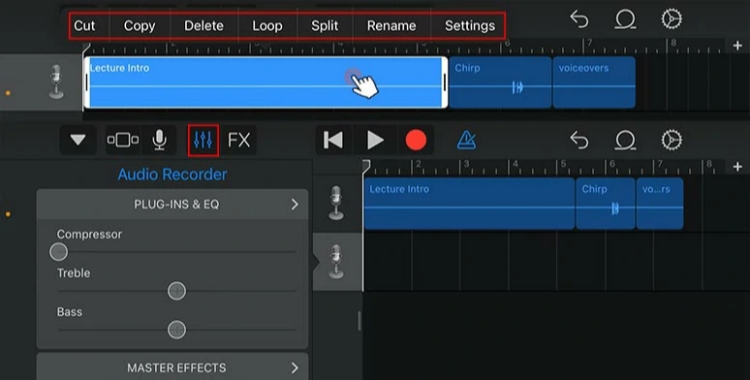
- Step 3: Tap one voice memo to split it. Or drag the end of a voice memo to trim unwanted segment. Besides, you can adjust volume, reverb sound effects and more.
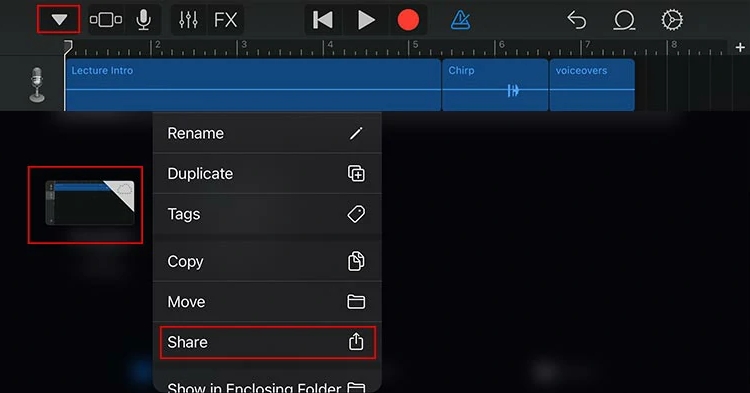
- Step 4: After audio adjustments, simply tap the inverted triangle icon in the upper left corner, tap My Songs and then rename the audio file. To export the combined voice memos, tap Share → Song → set audio quality → Share → Open in… → Save to Files.
Method 3. Merge Voice Memos
Specifically designed for voice memos, Merge Voice Memos app simplifies the combination process by providing a minimalistic interface that eliminates unnecessary complexity. Its purpose-built features ensure that even non-tech-savvy users can easily combine audio recordings on iPhone without a steep learning curve.
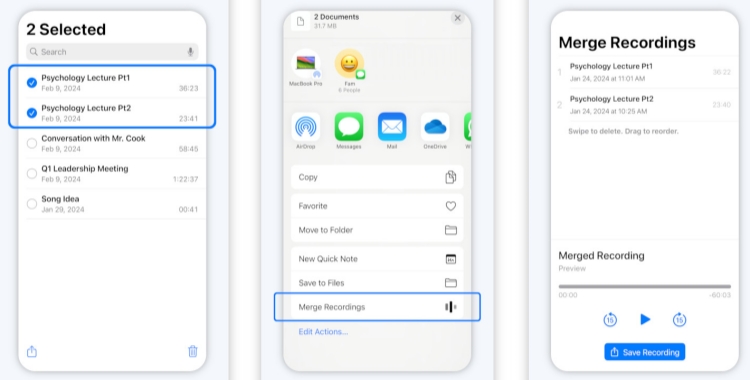
- Step 1: Launch Apple Voice Memos app on iPhone and choose the recordings you'd like to merge.
- Step 2: Tap Share button and scroll down to choose "Merge Recordings" option.
- Step 3: After successfully combined voice memos, tap on Save Recording button.
Method 4. Hokusai Audio Editor
Hokusai Audio Editor is a streamlined multitrack audio editing app designed for iOS. Its clean, intuitive interface allows users to effortlessly record, edit, and enhance audio with tools for cutting, copying, pasting, applying filters, and adding special effects. The app supports simultaneous editing of multiple audios and enables seamless mixing. It also simplifies file management by facilitating transfers to computer, sending to other iPhone apps, and direct uploads to cloud services.
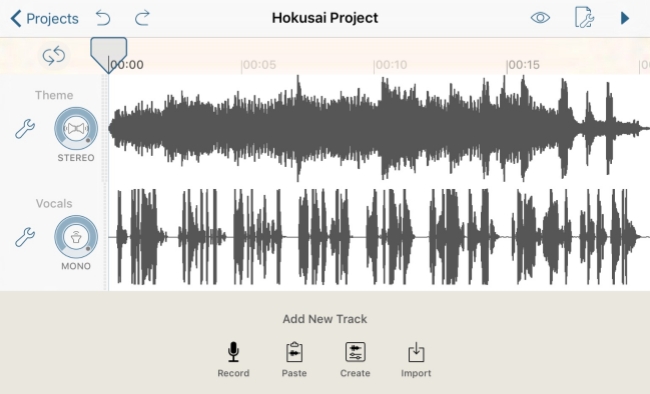
- Step 1: Share your voice memos and choose Save to Files option. Then download and install Hokusai Audio Editor on your iPhone from App Store.
- Step 2: Tap on "Import" to add your voice memos to Hokusai Audio Editor one by one.
- Step 3: Use the intuitive timeline to cut, trim, and position your recordings.
- Step 4: After completing your edits, tap the wrench icon in the upper-right corner. From the dropdown menu, select Share Audio to save your combined voice memo directly to the Files app.
Part 2. How to Transfer Voice Memos from iPhone to Computer
There are several ways for you to transfer your voice memos to your computer in batch or one by one. By doing so, you will be able to free up your iPhone space and make an identical copy of your important data to avoid accidental deletion.
Solution 1. Use iTunes
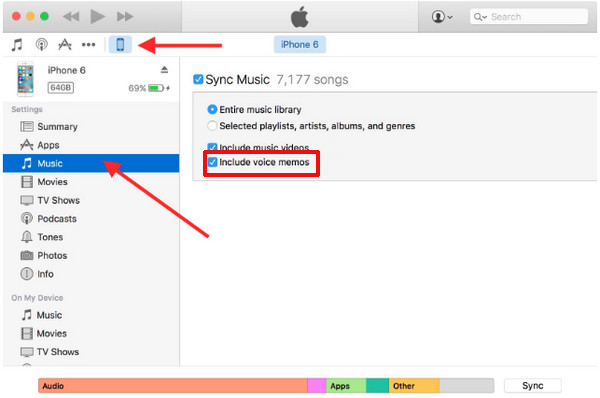
- Step 1: Install and open the latest version of iTunes on your computer, then connect your iPhone to your computer.
- Step 2: Find and click on your device icon, then choose the "Music" option from the sidebar.
- Step 3: Tick the checkbox of "Include voice memos", then click the "Sync" button to confirm.
- Step 4: After the process is finished, you will be able to find your iPhone voice memos in a computer folder named Voice Memos.
Solution 2. Use Built-in Share Feature
Another easy way to save your iPhone voice memos in computer is to take advantage of the "Share" feature of the Voice Memos app. You can share your voice memos to Google Drive, Gmail, OneNote, etc. After that, you are able to gain access to your voice memos by simply signing into the corresponding account.
- Step 1: Run the Voice Memos app on your iPhone and then select the voice memos you would like to transfer to your computer.
- Step 2: Tap "Share" option. Then you can send voice memos to "Mail", "Gmail", and more.
- Step 3: Download the voice memos to your computer.
Solution 2. Use iCloud
It's easy to sync all your voice memos from your iPhone to your computer at once. With iCloud Drive on, you will be capable of sharing various kinds of documents across your devices.
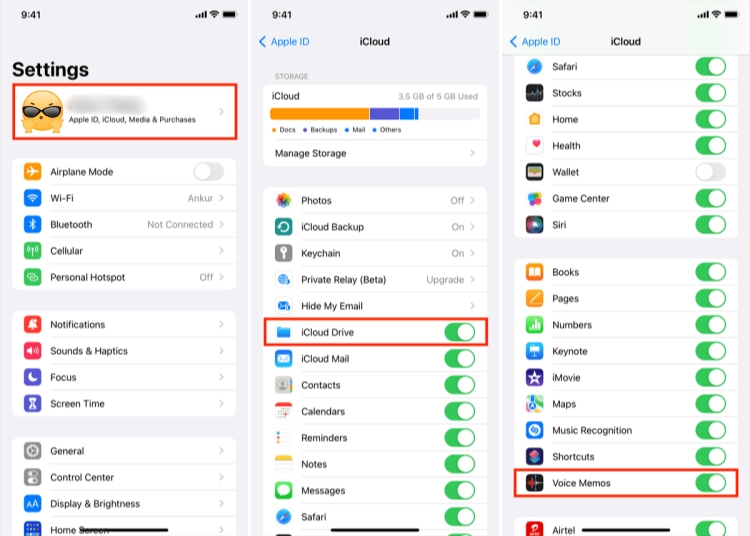
- Step 1: Open the Settings app on your iPhone and navigate to [Your Name] → iCloud → See All in Saved to iCloud section. Then enable Voice Memos.
- Step 2: Visit icloud.com on your Windows to download voice memos. For Mac users, access Voice Memos app to see all synced recordings.
Solution 4. Use AirDrop (Mac users only)
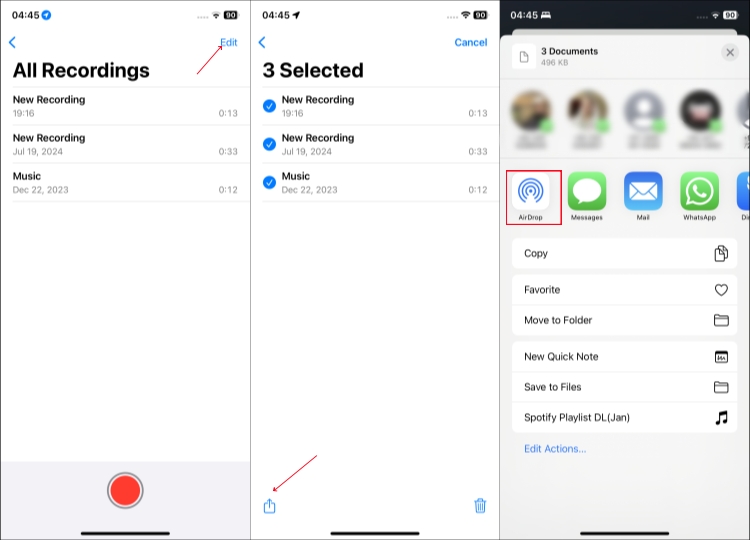
- Step 1: Turn on AirDrop on both iPhone and Mac.
- Step 2: Select desired voice memos on iPhone, tap the Share button, and use AirDrop to transfer recordings to your Mac computer.
Part 3. How to Combine Voice Memos on Mac and PC
Merging voice memos on a computer is especially useful for professionals who need greater precision and advanced editing capabilities. Follow us in this part to see how to combine multiple voice memos into one effortlessly.
Method 1. Joyoshare VidiKit [FREE]
Joyoshare VidiKit stands out as one of the most practical and powerful solutions for seamlessly combining audio recordings while preserving original quality. Beyond simple merging, it empowers you to effortlessly cut and convert files to your exact preferences. Designed with universal accessibility in mind, this intuitive voice memo combiner ensures smooth operation for both professionals and beginners alike.
What truly sets it apart is its exceptional format compatibility. Whether your voice memos are in MP3, WAV, AAC, or other formats, Joyoshare VidiKit handles them all with ease. For ultimate flexibility, it offers dual merging modes: lossless combination for perfect quality retention and customizable merging for personalized audio output.

- Wide Format Support – Process MP3, WAV, AAC, FLAC, M4A, and more
- Blazing-Fast Merging – Combine audio files at 60X speed on Windows & Mac
- Lossless Audio Quality – Merge unlimited recordings without quality loss
- Precision Editing – Trim or remove unwanted segments effortlessly
- Advanced Customization – Adjust codec, bitrate, channels, and sample rate
- All-in-One Audio Toolkit – Record, convert, and add sound effects for professional results
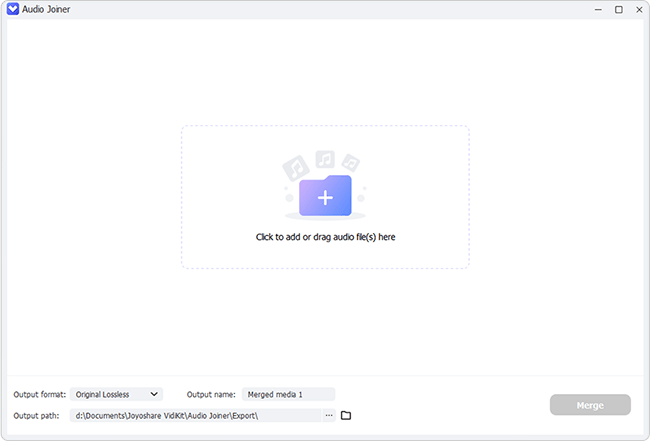
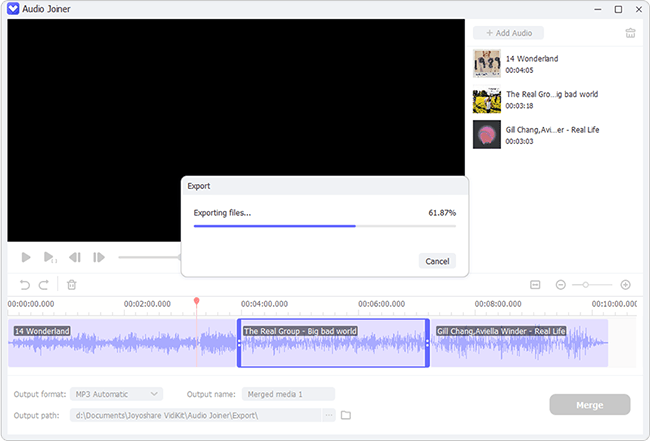
Step 1 Add Voice Memos into Joyoshare VidiKit
Download and install a compatible version (Mac or Windows) of Joyoshare VidiKit on your computer. After running it, open Audio Joiner under the Audio section. Then click on the center area to browse and add your voice memos. More conveniently, you can directly drag and drop them to the program.
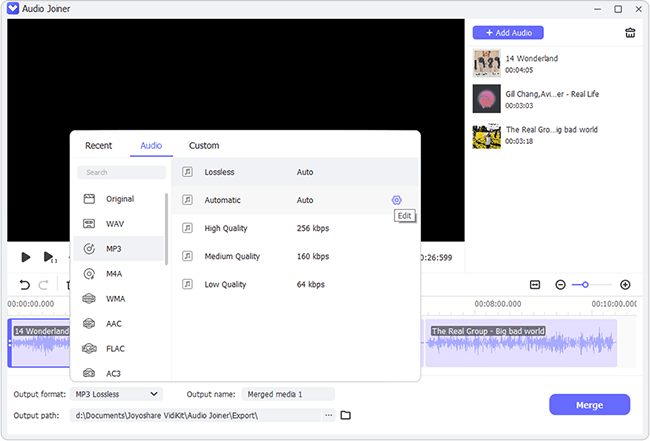
Step 2 Select an Output Format
To preserve the original audio quality, go to Output format → Audio → Original → Lossless (Auto). Alternatively, you can select a different format if preferred. After confirming, don't forget to click the gear-shaped 'Edit' button to further customize settings like quality, channel, encoder, sample rate, and bitrate.
Step 3 Remove Needless Segments from Voice Memos
You can now listen to your voice memos individually. To remove unwanted sections, simply drag the blue timeline below the preview window. You can also reorder the files as needed.
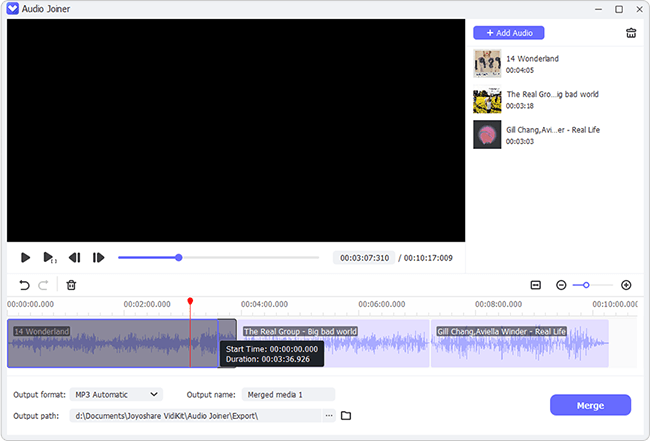
Step 4 Combine Voice Memos and Export Recording File
Now, just click the 'Merge' button to begin combining your audio files. In moments, your voice memos will be seamlessly merged into a single file and automatically saved to a local folder.
Method 2. Audacity
Audacity is a highly popular, free, and open-source audio editor available for Windows, macOS, and Linux. It offers a timeline-based interface perfect for advanced editing, though it does have a steeper learning curve.
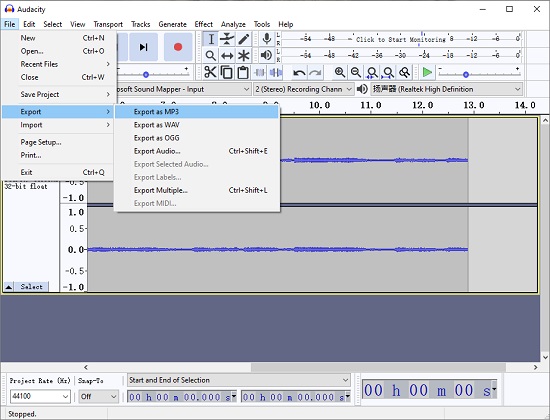
- Step 1: Get the latest version of Audacity from the official website and install it on your computer.
- Step 2: Open Audacity and head to File → Import → Audio to add all voice memos to the timeline.
- Step 3: Drag and position each recording on the timeline. Arrange them sequentially for continuous playback, or place them on separate tracks to make simultaneous edits.
- Step 4: Use "Selection Tool" to select wherever you don't need and right-click "Cut" option to remove the segment. Furtherly adjust volume and add sound effects.
- Step 5: Once ready, adjust the order and click on File → Export Audio → Export to computer to save combined voice memo in MP3, WAV, FLAC and other format.
Part 4. How to Merge Voice Memos Online
In consideration of the situation where some might prefer to combine voice memos without downloading anything, Online Audio Joiner is recommended. It supports joining audio files of various formats quickly and gives the ability to convert them to MP3, M4A, WAV, FLAC, etc. For your convenience, below concentrates on how to make use of it to combine voice memos at every step.
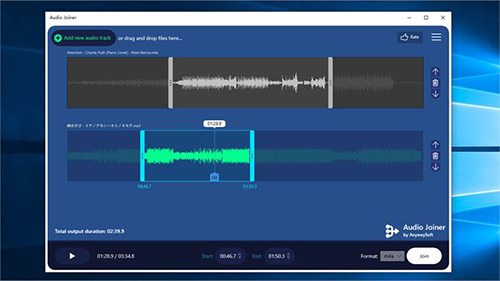
- Step 1: Open Online Audio Joiner in the browser and get into the main interface of this online joiner.
- Step 2: Click "Add tracks" to import voice memos to be combined or use the drag-and-drop function to add files.
- Step 3: Use the "Play" button to preview them one after the other. To cut something undesired off them, move the blue slider or set "Start" time as well as "End" time.
- Step 4: If required, click on the up arrow or down arrow button to rearrange the sequence of each voice memo file. Then, specify an output format and hit "Join" to combine your voice memos.
Part 5. FAQs About Combining Voice Memos
Still have questions about managing your audio recordings? Here are the answers to the most common questions users ask when trying to merge voice memos.
Q1: Can I combine voice memos on iPhone without downloading a third-party app?
A: Yes! While the Voice Memos app itself doesn't have a merge button, you can use Apple's pre-installed apps like iMovie or GarageBand to stitch your recordings together directly on your iPhone for free.
Q2: What audio format are Apple Voice Memos saved in?
A: By default, iPhone voice memos are saved in the MPEG-4 Audio (.m4a) format. If you need to share your merged file with Android or Windows users, it is highly recommended to use a desktop tool like Joyoshare VidiKit or Audacity to export the final file as an MP3.
Q3: Will I lose audio quality when I merge voice memos?
A: It depends on the method you use. If you use a professional audio joiner (like Joyoshare VidiKit) and select "Lossless" or "High-Speed" mode, there will be zero quality loss. However, if you convert the file to a lower bitrate MP3 during the merge process, the audio quality may be slightly reduced.
Q4: How do I share a large combined voice memo?
A: If you merge several long lectures or interviews, the final file might be too large to send via email or iMessage. The best workaround is to upload the merged file to a cloud service like iCloud Drive, Google Drive, or Dropbox, and then share the download link with your recipients.
Conclusion
While Apple doesn't provide a direct way to merge recordings inside the Voice Memos app, combining your audio files is still a straightforward process. If you want to handle everything on your phone, iMovie and GarageBand are excellent free options. However, for users dealing with multiple files, interviews, or podcasts, transferring the files to a computer and using a dedicated tool like Joyoshare VidiKit provides the best combination of speed, format flexibility, and audio quality.