When coming to edit music, many beginners may feel worried and have no idea on how to do it properly. However, whether it is independent audio processing or video production, you need to deal with music to make the output file look more professional. Want to basically cut and trim music? Now you can do it easily with an easy-to-use free audio editing program - iMovie. This Apple's default app is designed for macOS and iOS, so you can use it to cut music on Mac and iPhone/iPad/iPod touch. Next, we will show you how to trim music in iMovie step by step.
- Part 1. Trim Music in iMovie on Mac
- Part 2. Cut Music in iMovie on iPhone
- Part 3. Lossless iMovie Music Cutter
- Part 4. iMovie Audio Editing Tips
Part 1. How to Trim Music in iMovie on Mac
Splitting or trimming music means you can rearrange or shorten the length of the audio or clip. Now just follow the detailed guide below to see how easy it is to trim music in iMovie on the macOS computer with three different ways.
Method 1 Trim Target Music in Media Window
To begin, please open the iMovie program on Mac. Click the "Import Media" option to add a song file. Next, select your music file and drag the left and right edges to locate the section you want to trim. In this way, you can finish trimming task now directly in Media Window.
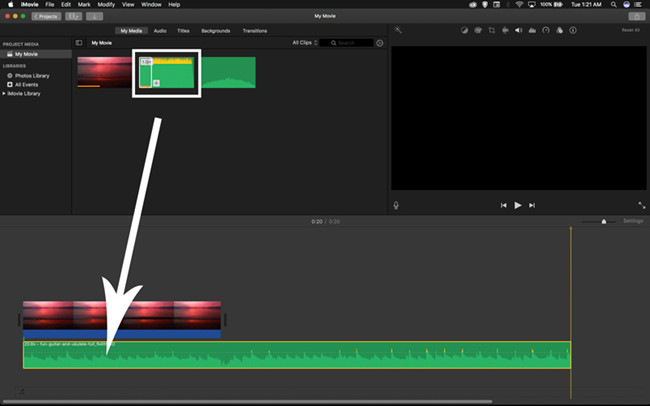
Method 2 Trim Music in the Timeline
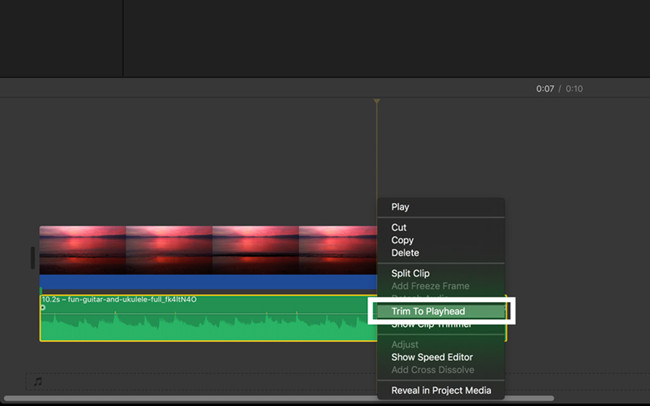
Or you can simply drag and drop the imported music from Media window to the timeline in iMovie. Then, highlight the file and position both start and end trimming points as you like. Alternatively, it's available to set specific frame with playhead. Right-click on the music section and conduct "Trim to Playhead" to trim the music file to the proper length.
Method 3 Cut Music in the Timeline
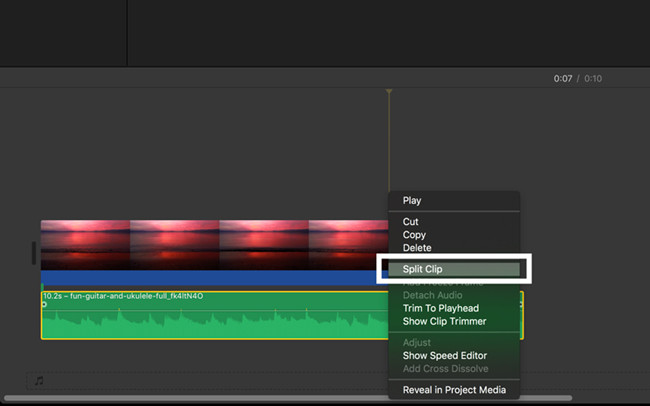
Just get your music ready on the timeline and let the playhead stay where you want to trim/cut. Right-click to select the "Split Clip" to cut the audio file into two parts, and you can keep the one you want and delete the one you don't like.
After finishing the trimming or splitting, now you can export the song file by pressing the "Share" icon in the top right corner. Then rename the file and choose a location for storage, and click the "Save" button to export it to your Mac. You're also allowed to publish it to a number of popular sharing websites.
Part 2. How to Cut Music in iMovie iPhone
Alternatively, you can also trim or cut a song file on your iPhone with iMovie app in a few clicks only. The following guide will tell you how to do it in detail.
Step 1 Open iMovie and import a music file
Download the iMovie app from Apple store, and then install it on your iPhone. Open it and then add an audio file to the program. Remember to drag it to the Timeline for trimming or splitting.
Step 2 Trim or split the song as you like
Tab the audio clip you want to trim and the trim handles appear in yellow. Drag the trim handles to determine the start point and end point, and then tap outside to make the handles disappear.
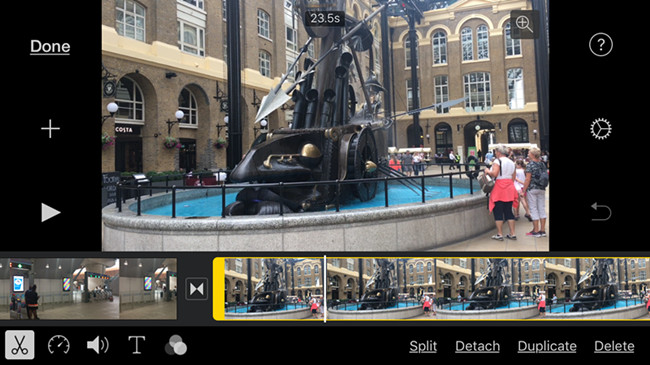
If you want to split an audio clip, you can move the playhead to desired position and then tap the Scissors icon in the bottom-left corner and then press the "Split" button to cut the music file as you wish.
Step 3 Share the file
When you're happy with the file, tap the "Done" button. Now you can listen to the trimmed or splitted song and then press the "Share" button to send it to your friends or families.
Part 3. How to Cut Audio in iMovie Alternative - Joyoshare VidiKit (PC & Mac)
Joyoshare VidiKit - Video Cutter is an optimal iMovie alternative for Mac users to cut audio and video files at a super-fast speed without causing any quality loss. With the program, you can easily trim large audios into small segments, create customized ringtones for smartphones, remove background noise of the music file, and even extract sound from video. Besides, it offers you an opportunity to enhance your songs, such as apply special sound effects, add new background music, adjust sample rate, etc.
This music cutter supports tons of input and output media formats such as MP3, WAV, AAC, AC3, MKA, OGG, AIFF, MP4, MPG, etc., as well as a variety of common portable devices like Apple iPhone, iPad, Android, Samsung TV, Xbox 360, PSP, Blackberry Bold, etc.
- Cut or split music file fast and losslessly
- Trim and convert music at 60X faster speed
- Extract and export audio file in any format or device
- Allow specifying codec, sample rate, channel and bit rate
- Advanced audio editing tools to effect, record, repair, compress, etc.
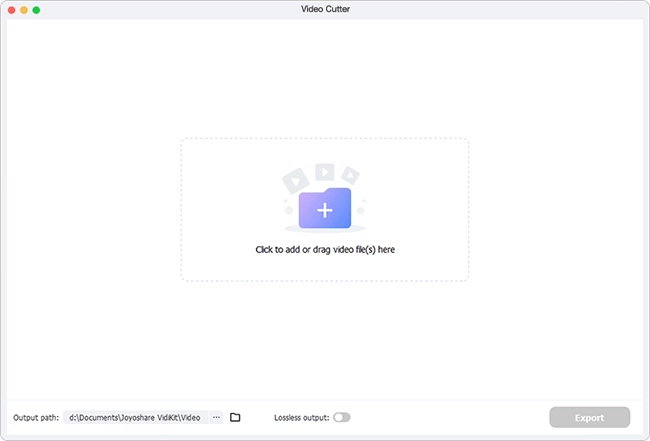
Step 1 Launch Joyoshare and import a music file
First, go to the download page of Joyoshare and choose Joyoshare VidiKit. Download and install it on your Mac or Windows. After that, launch the program, open video cutter tool, and add the required file by clicking the "Open" button. Or simply drag and drop music to the main interface.
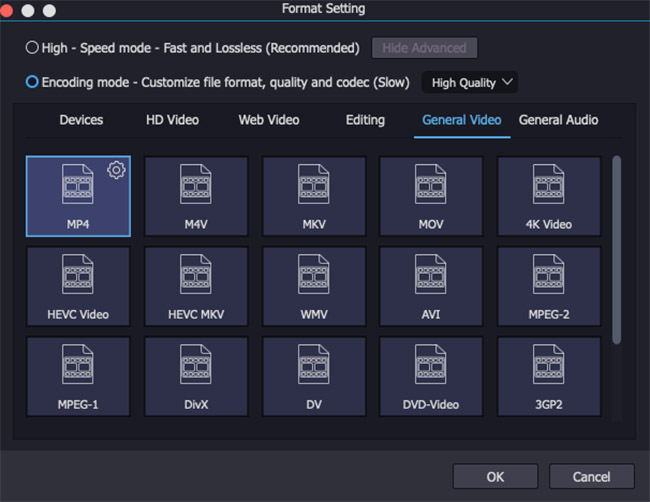
Step 2 Choose an output mode
Then click the "Format" button and you'll see available modes out there. The "High-Speed mode" will help to trim and convert the audio file quickly in lossless quality while the "Encoding mode" will give you rights to customize the video in your preference, such as video quality, codec, bit rate, formats, devices, etc. Here we recommend you to choose high-speed mode.
Step 3 Set segments to cut
Back to the main interface. Move the blue handles to decide the start time and end time for the audio clip or enter the exact time values manually. If you are in encoding mode, you can alternatively click the Edit icon next to the clip and then tap the "Trim" tab in the new window. Similarly drag the sliders to set the desired portion. Keep in mind that you need to press the Scissors icon before hitting the "OK" button to close the window.

Note: The same audio file can be cut into several clips at a time. If you want to join them to form a new one, you can go to click the "+" button and tick the "Merge segments" option.
Step 4 Save trimmed music
Now click the "Start" button to let this music cutting software work losslessly. Wait a few seconds, you can find your trimmed audio file on the destination folder of your computer.
1 Detach Audio from Clip
Click to choose your video clip in the timeline on iMovie, head to "Modify" > "Detach Audio" to seperate audio and video. You can then easily cut out the middle of the audio, move it to desired position, extend it and more.
2 Show Waveforms
It's available to see waveform of each audio track in iMovie. You can go for "View" and choose "Show Waveforms" in the drop-down menu. It helps to see intuitive volume level. If possible, you can copy and paste a video segment with similar waveform to extend the music naturally.
3 Adjust Audio
There is an "Adjust" tab in iMovie that allows you to change volume, reduce noise, equalize audio and apply effect.
4 Edit Audio in Timeline
iMovie enables you to adjust the volume of a video directly by dragging the volume bar, which shows in percentage. It besides can add Fade In and Fade Out effects to make the audio more matchable.
