With a logo similar to the snake, Razer laptop has been widely acclaimed by users all over the world for its ultimate performance. Game lovers particularly show a preference for it since Razer always brings gamers a better experience with cutting-edge innovations. No matter you have high demand for gaming or daily use, Razer covers everything you might need. That's the main reason people choose Razer computer as their first option. Also, its media creation feature stands out on the market, which produces the increasing demand for screen recording. So, how to screen record on Razer laptop? In this article, you are able to know about various practical methods.

- Part 1. Use Razer Cortex as Screen Recorder
- Part 2. The Best Screen Recorder for Razer Laptop [Hot]
- Part 3. More Options for Screen Record on Razer Laptop
- Part 4. Conclusion
Part 1. Use Razer Cortex as Screen Recorder
Razer Cortex is primarily used for getting better FPS while playing, yet it is also helpful in boosting the system performance in unlocking PC's potential. It could also be applied to record without any trouble. However, the recording feature of this software would be disabled if you fail to activate the Razer Cortex overlays and set overlays in the settings of the game. If all settings are adjusted properly, you could follow these steps to screen record on Razer desktop.
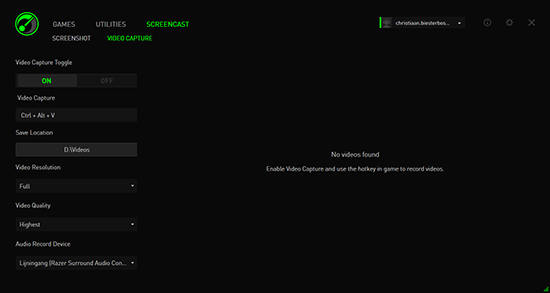
- Step 1: To get started, you need to install Razer Cortex on your computer ahead. After logging in, choose the proper recording mode according to your own needs, including Game Mode and Screen Mode. If you have target game to record, you could add the game manually by using the Add Game option.
- Step 2: Then use the hotkeys to enable the Razer Cortex overlay, which is often the Ctrl and ‘ keys. You could tune the settings and features in the Razer Cortex recording setting menu.
- Step 3: Last, press Ctrl + Alt + V to start and stop recording quickly.
Part 2. The Best Screen Recorder for Razer Laptop [Hot]
If you want to record customized and dedicated videos on Razer, Joyoshare VidiKit is crafted to provide this kind of service. It could not only help you with recording all screen videos effortlessly, but also keep them in high quality with no lag. With its independent audio recorder, it's simple for you to record different types of audios on your computer. Joyoshare VidiKit is equipped with the multi-humanized design. For example, you are allowed to set schedule recording tasks in advance to save time. And there is no time limit to record everything on your screen. Moreover, Joyoshare VidiKit comes in handy to record gameplay in 1080p, which is a trusted screen recorder while gaming.

- Record all screen with the highest quality on Razer laptop
- Multiple option of screen recording modes
- Available to watermark, highlight cursor, edit after recording
- Save audios in different formats with built-in audio encoder
Step 1 Install and Launch Joyoshare VidiKit
After installing Joyoshare VidiKit on your Razer computer, open it up with double-click. The interface is quite friendly, you could easily find Screen Recorder in the Record section presented on the left side.

Step 2 Select Capture Area
Then the interface is divided into three components. In Capture Area, you are allowed to customize the capture area by clicking the + icon. The width and height could also be reset manually based on your requirements. In the middle section, you are able to turn on or turn off the System Audio and Microphone Audio. The audio resource can be selected in the drop-down lists of Microphone Audio.

Step 3 Adjust Recording Preferences
What makes Joyoshare VidiKit remarkable is the comprehensive recording settings. In Basic record options, you could select the format, adjust shortcuts, add and remove watermarks. Record time options helps you schedule the recording tasks in advance. You could also make some small tweaks in Cursor options.

Step 4 Screen Record on Razer Laptop
When everything is settled properly, click on REC to start recording on Razer with no lag. In the recording process, you could pause and take screenshots as you like.

Step 5 Edit Razer Recorded Video
Click Stop to end recording, then you can preview recorded videos in History list. And you could Edit Name, Open file location and Edit by clicking icons beside the video.

Part 3. More Options for Screen Record on Razer Laptop
EaseUS Screen Recorder
EaseUS RecExperts is also recommended to screen record on a Razer computer. It supports recording screen, audio, game, and webcam. You could use it to save recordings in MP4, MOV, etc. What's more, EaseUS RecExperts offers various recording options for you to record without restriction. The operation of it is also quite simple, you could take the steps below to start recording.
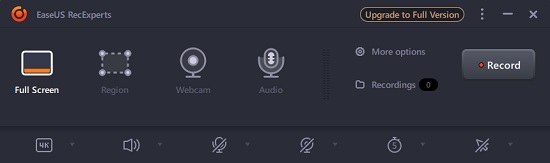
- Step 1: Download the software first. Open it up, you could choose either the Full Screen or Region mode. The previous one is for capturing the whole screen, while the latter is for selecting the area.
- Step 2: Then you could choose whether System sound is on, and you can turn all the system sound off at the same time. And you could set Auto stop, Task scheduler, Auto split in the bottom of the interface.
- Step 3: Click the REC button and start recording, while Stop button is to end the recording.
Camtasia Screen Recorder
Camtasia Screen Recorder can help you record anything on Razer screen, be it games, videos, or audios. Camtasia is equipped with a professional video editor. You could edit your recorded videos by adding transitions, audio effects, annotations, and more. What's more, you could share your recorded videos to platforms like YouTube directly in high quality. If you want to use this too to screen record on Razer, you can:
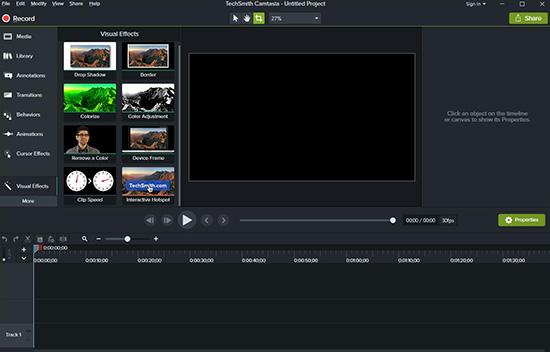
- Step 1: Open Camtasia up, you should click the Record button on the top left, then an interface would pop out.
- Step 2: You could customize your recording area in Screen 1. You could also adjust Microphone and System Audio and Web with simple clicks.
- Step 3: Click the REC and the recording proceeds.
Part 4. Conclusion
In the article, we have introduced different methods about how to screen record on Razer laptop. The Razer Cortex is able to achieve this, while is limited to higher demands. And Joyoshare VidiKit is a powerful recording tool for you to cover all your needs without losing quality. Hopefully, you could find the best way to record better videos on Razer laptop.
