
Watermark is an important measure to protect video creators' knowledge property as well as creativity and originality. It is typically used to protect content and to claim ownership of a digital asset. Just try to imagine what it would be like if your digital content is downloaded by a simple right-click and distributed without authorization for a thousand times. So how to add watermark to screen recording to protect it could be a series problem. It is worth mentioning that this article tries to focus on some handy screen recorders that enable you to record screen with watermark rather than some free video watermark software, which is used to add watermark to a recorded or downloaded video.
- Part 1. Joyoshare Screen Recorder (Highly Recommended)
- Part 2. Icecream Screen Recorder
- Part 3. Super Screen Recorder
- Part 4. RecMaster
Part 1. Add Watermark to Screen Recording - Joyoshare Screen Recorder
Without watermarks, your valuable digital assets posted to public servers or websites can be susceptible to content theft or unauthorized use. Now that watermarks have great significance, how to add a watermark to your screen recording videos to claim a copyright to them? No worries. Joyoshare Screen Recorder is here to help. It not only allows you to record screen without watermark, but also enables you to insert your own watermark in various forms. Steps are pretty simple. Read on to learn how.

- No limitations on watermark file size
- Capture any video and audio from any site
- Record screen in 1080p/4K at up to 60fps
- Support a variety of popular video, audio, and image formats
- Best video tutorial maker and gameplay recorder for PC/Mac
-
Step 1 Open Joyoshare Screen Recorder after Installing
Joyoshare Screen Recorder supports both Windows and Mac. Download your wanted version for your computer and then double-click to open its main interface after installation.

-
Step 2 Adjust Settings for Watermark
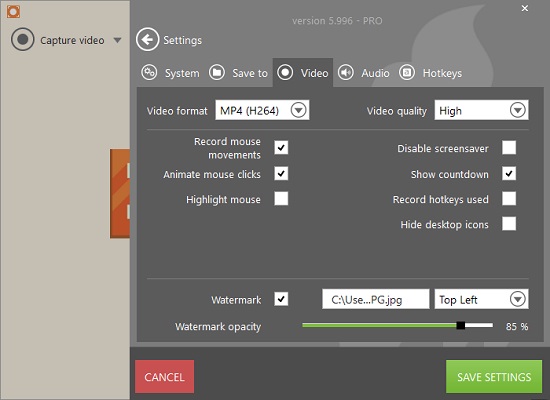
Click the little gear icon in the lower-right corner of the main screen to unfold the panel. Under the "Basic record options", you are able to press the "Watermark" button to open the "Watermark Setting" window.

Here you can tap the "+" icon to import your image in JPE, PNG, BMP, TIFF, etc. and customize its position (9 positions are available), X/Y margin, scale as well as transparency. Next, hit on the "OK" button to proceed.
-
Step 3 Start Recording Screen with Watermark
After confirming other kinds of settings, you are able to press the "REC" button to begin recording your screen. Tap the "Stop" button on the minimized toolbar to stop recording. And finally, you will get a screen recording video with your watermark.

Part 2. Add Watermark to Recording - Icecream Screen Recorder
Icecream Screen Recorder is an easy-to-use recording tool to record webinars, video calls, game clips, etc. You are allowed to capture your recording area freely and record screen with audio and webcam. In addition, with this program, you can personalize your image watermark settings before recording. Up to 5 different positions and customizable opacity are available. But the fact that its supported maximum size of an image is 300×300 pixels could be annoying sometimes.
Step 1: Download and install Icecream Screen Recorder and open it once the installation is completed;
Step 2: Press the "Settings" button in the lower-right corner of the screen and tap the "Video" tap;
Step 3: Check the "Watermark" checkbox to turn on it at the bottom of the window, and then press within the blank white rectangle to the right of it so that you can select a file you would like to use as a watermark from your folder;
Step 4: Now select one of the five available positions for your watermark and customize the watermark opacity if necessary;
Step 5: Finally, press the "SAVE SETTINGS" button in the lower-right corner of the screen to save the changes you've made;
Step 6: From now on your screen recording videos will contain the watermark you set, and if you decide to disable it, you can go back to the "Settings" window and uncheck the "Watermark" checkbox.
Part 3. Add Watermark When Recording Screen - Super Screen Recorder
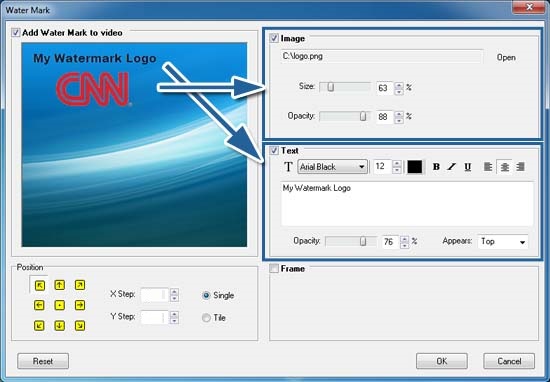
Different from other screen recorders, Super Screen Recorder supports adding image watermark in PNG as well as text watermark with changeable font, size, style, etc. What set the recording tool apart from other conventional competitors is that it allows you to stylize the background frame under the text or image watermark. You have the freedom to set the border size, background color and frame opacity. But this screen recorder only works with Windows.
Step 1: Download the Super Screen Recorder for your Windows computer;
Step 2: Find the "Mark" button on the tools bar and click on it to activate the watermark settings window;
Step 3: Now you will be able to set the position for your watermark and add the text or an image to use as your watermark. You can not only change text font, size, style and capacity, but also adjust image size, position and opacity;
Step 4: Then you can start to record your screen. After recording, you will find that your recording has been watermarked.
Part 4. Record Screen with Watermark - RecMaster
RecMaster is one of the professional and reliable screen recorders, which not only allows you to record any size of the desktop screen, but also provides you the custom watermark feature. You will be allowed to embed image or text watermark to your screen recoding, whose position, transparency, size, and more can be changed easily and flexibly.
Step 1: Download and launch RecMaster, and then choose a recording mode;
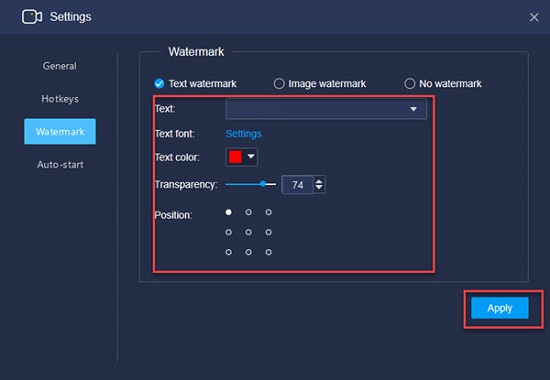
Step 2: Press "Settings" and tap "Watermark" and choose either "Text watermark" or "Image watermark" in the window;
Step 3: If you tick the checkbox of "Text watermark", you can begin to type in your text and adjust text font, color, transparency and position;
Step 4: If you select the "Image watermark" option, you will be able to press the "Add image" button to import your image and change its transparency as well as position;
Step 5: Go back to the setting panel of your recording mode and click "REC" to start recording and you could see the watermark is successfully added to the video.
