Developed by Microsoft, Windows Media Player (WMP) is a multimedia player and library application for Windows users to play music and videos as well as view images. Although there are many other pieces of player software increasingly growing, Windows Media Player still holds its widespread popularity among users all over the world. Generally, it does a good job on the task of media playing. But sometimes, chances are that subtitles cannot work in it. In this case, a quick solution is to add external subtitles. How to add subtitles to Windows Media Player? This article gives a full guide.
- Part 1. Add Subtitles to Windows Media Player
- Part 2. Add Subtitles in Windows Media Player Alternative
- Part 3. Must-know Info about Subtitles in Windows Media Player
Part 1. How to Add Subtitles to Windows Media Player
The procedure of adding subtitle on Windows Media Player is not that difficult but a little complicated, as Windows Media Player itself does not develop the ability to add external subtitles to a video unless with the help of third-party codec application. With the avoidance of something wrong causing the subtitling failure in Windows Media Player, just follow the steps detailed below to conduct.
Step 1 Open video in Windows Media Player
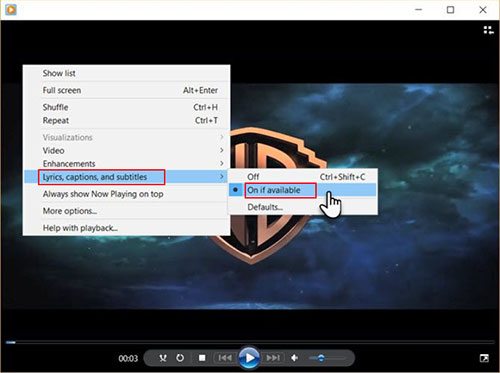
Before everything, please save the target video and the desired subtitle file in the same name and ensure them to come with the same file name. Then, open your video in Windows Media Player and right-click on the play screen. There will appear a dialog box, in which head to "Lyrics, captions, and subtitles" > "On if available".
Step 2 Install third-party codecs
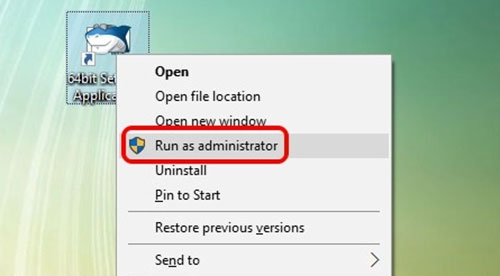
In the next step, start to download and install DirectVobSub (VSFilter) that automatically integrates within Windows Media Player to read and display external subtitle files. Please install the official version of DirectVobSub Codec to avoid virus attacks. After that, get another codec called Shark007 ADVANCED Codec installed on your PC. It is available for both 32bit and 64bit systems. According to your actual conditions, open 32bit Settings Application or 64bit Settings Application after the installation. You need to run it as administrator.
Step 3 Add subtitles to Windows Media Player
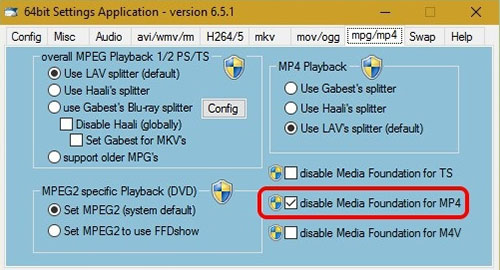
In the interface of 32bit/64bit Settings Application, go for the corresponding video file format as shown below. Whereafter, enable the "disable Media Foundation for ..." option. And finally, head to "Swap" from the top-menu bar and check the "disable Windows Media Foundation" box. After these steps, restart Windows Media Player and play your video in it. You will find that subtitles start working.
Part 2. How to Add Subtitles in Windows Media Player Alternative
Windows Media Player is perfectly available to Windows users. However, its exclusive applicability is barred to Mac users. Happily, here is a recommendation of an alternative - Joyoshare Video Joiner that can help to fix subtitle addition on both Windows and Mac.
It's an easy-to-operate video merging software with distinguished features. Not simply does it manage to join in bulk multiple files from same source in a lossless way but also delivers the ability to subtitle, watermark, crop, trim, rotate, flip video, and add audio or background music, extract audio from video, and many others. Besides, with wide compatibility come, it is capable of accepting dozens of media formats, including MP4, MPEG, TS, AVI, WMV, MOV, MP3, M4V, FLV, SWF, etc.
Highlights of Joyoshare Video Joiner:
- Output video to any other format at 60X phenomenal rate
- Merge media files in the same format with no original quality loss
- Designed with two modes: high-speed mode and encoding mode
- Support adding multiple types of subtitle files to any video in easy steps
- Various editing tools: subtitle, watermark, effect, trim, crop, background music, etc
Step 1 Drag video to Joyoshare Video Joiner
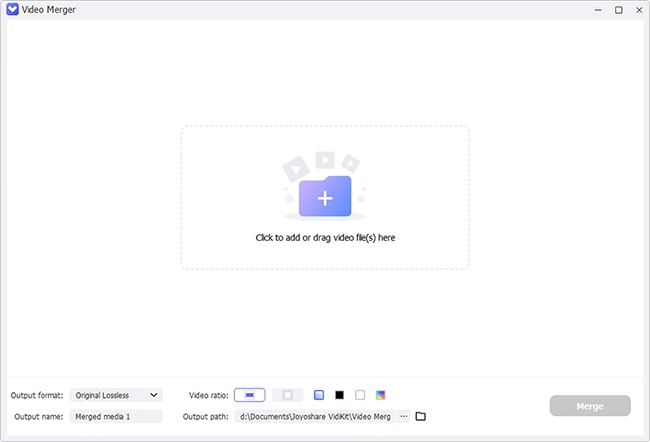
First of all, you need to install Joyoshare Video Joiner on your personal computer. After running it, click "Open File" icon at the bottom left of the first window to import the video to be subtitled. Alternatively, directly drag the video and drop it to the specified position.
Step 2 Start the encoding mode for subtitling video
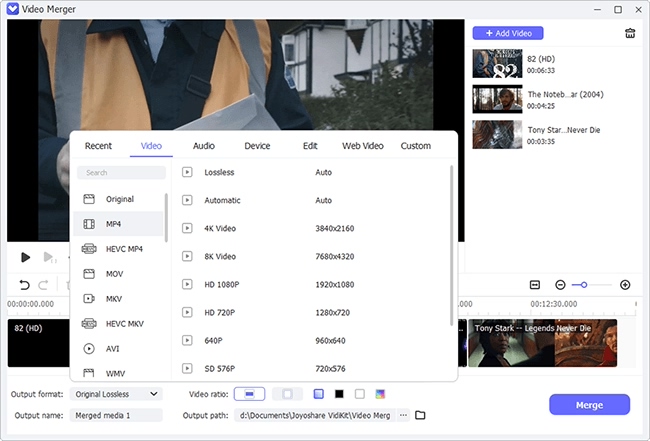
Next, go forward to the "Format" option. In a new window, be sure to make the encoding mode enabled and then choose an output format. If necessary, you are allowed to touch a gear icon at the top right of the chosen format to customize codec, resolution, bit rate, frame rate, sample rate, etc. for the export video.
It is important to know that only in the encoding mode can the edit function be activated, thereby you have the permission to insert subtitles to your video. The high-speed mode is a loss-free mode, which is designed to combine files with the same codec into one with the original quality kept at 60X quick speed.
Step 3 Edit and add subtitles to video
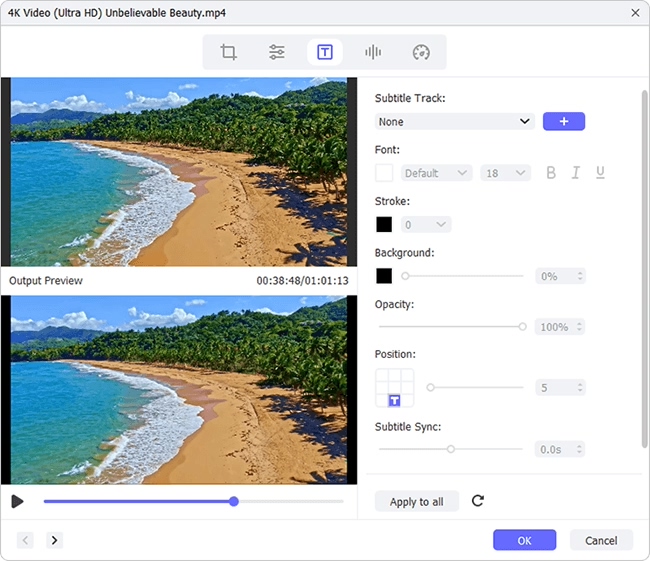
After the customization of output format, tap "OK" to bring yourself back to the main interface. Now, locate the "Edit" button beside your imported video file to access the editing screen. There are various editing tools. But for adding subtitles, please head to the "Subtitle" tab. In the "File" section, hit on "..." icon to import the prepared subtitle file. Like this, the subtitles will be automatically inserted into your video. You can preview the result in the right window. If there is any dissatisfaction, you are free to adjust the position, margin, scale, and transparency of the captions or click a "T" icon to modify font, color, style, size, etc.
Step 4 Output and save the subtitled video
Last of all, you are only required to tap on the "Convert" button in the lower right corner of the beginning screen to output the video with subtitles added. If you don't change the output path, the final video will be saved in a "converted" folder by default.
Part 3. How to Display Captions/Subtitles in Different Versions of Windows Media Player
Instructions described below is applied to display captions or subtitles in Windows Media Player. Depending upon the version you install, check and follow the appropriate guide.
Windows Media Player 11
1. Open Windows Media Player and tap on "Play" from the top bar or press the Alt and P keys at the same time;
2. Followed by the "Lyrics, Captions and Subtitles" option from the drop-down menu;
3. Head to "On if available" and restart Windows Media Player.
Windows Media Player 10
1. Make sure that Windows Media Player is in "Full Mode" and run it;
2. Choose "Tools" tab > "Options" > "Security" > check "Show local captions when present";
3. Go to "Play" > "Captions and Subtitles" > "On if Available". Likewise, you need to restart Windows Media Player after that.
Windows Media Player 9
1. Launch WMV Player on PC and set it in "Full Mode" rather than "Skins Mode";
2. From the top menu bar, please select the "Play" option and then to "Captions and Subtitles";
3. Next, choose "English Captions" and re-open Windows Media Player for the customized settings to take effect.
Windows Media Player 8
1. After running Windows Media Player on computer, proceed to "View" and followed by "Now Playing Tools";
2. From sub options, opt for "Captions". Remember to close down the player and open it again for the changes you make to work.