iPhone Recovery Mode vs DFU Mode: What Are the Differences?

iPhone Recovery mode and Device Firmware Update (DFU) mode have numerous similarities as well as differences. These two modes usually come in handy at the appointed time when you need to fix iPhone software related problems. Besides, there are other tons of things that users can do with these modes. However, many users get confused in terms of drawing the line of DFU mode vs Recovery mode. But here's the kicker: This article is going to elaborate the differences between recovery mode and DFU mode such that you won't get mixed up the next time you need to engage any of these modes for your iOS device welfare.
1. What Are DFU Mode and Recovery Mode Used for?
Recovery mode is one that you can put your iOS device in so as to let it get upgraded. It actually restores your device to a firmware, although you as the user cannot be able to make any adjustments whatsoever. The whole process uses iTunes and it also invokes the iBoot process. This process works in such a way that ensures that the signed firmware version to be installed is actually equal or greater than what the device already has.
DFU mode, on the other hand, is a mode on Apple's iOS devices that seems to have more power. It is in this mode that the iOS device's hardware is able to interfere with the iTunes software even though it doesn't invoke the iBoot process. In a nutshell, iPhone DFU mode will see to it that the iBoot process, as well as OS loading is actually bypassed. This is for the purpose of allowing more control of the device that is using iTunes together with the firmware that is to be installed on the device. An iOS device that is in DFU mode will actually just show a blank screen with absolutely nothing on it. And since the bootloader is not to be used in this mode, it becomes easy to restore your iOS to an older version.
2. Situations Where to Use Recovery Mode and DFU Mode
Recovery mode can be used in an event where these situations occur.
- When your screen is stuck on the Apple logo for quite a considerable length of time and without progress.
- Use the Recovery mode also when iTunes does not recognize your iOS device.
- It is also suitable when your device is locked or the password cannot be recognized.
- You can also use it when you are recovering your device after a jailbreak.
Meanwhile, use DFU mode in the following situations;
- When you want to restore your device from a state of a corrupted bootloader or other application hitches.
- It is also suitable when you want to upgrade or downgrade firmware because there is actually no downgrade protection in DFU mode.
- DFU mode can also be used to unlock your SIM.
3. How to Enter/Exit Recovery Mode and DFU Mode
3.1 How to enter/exit recovery mode
The following is the step-by-step guide on how to enter recovery mode:
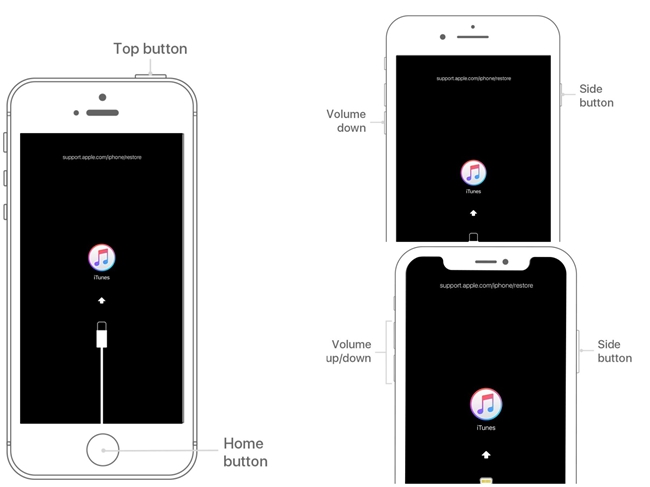
Step 1. First of all, you need to turn off your device;
Step 2. Then press and hold the Home button for a few seconds;
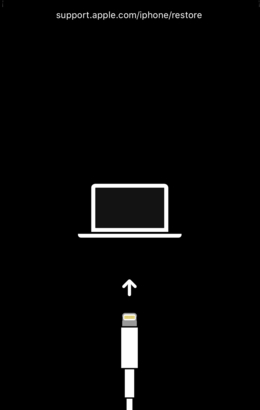
Step 3. Next, connect your iOS device to a computer with iTunes. Once you see the iTunes logo and the cable on the phone, know that you've already entered the Recovery mode.
Here are the quick steps to exit the recovery mode:
Step 1. Switch off your iOS device by holding down the Home and Power buttons;
Step 2. Next, boot your device by pressing the power button.
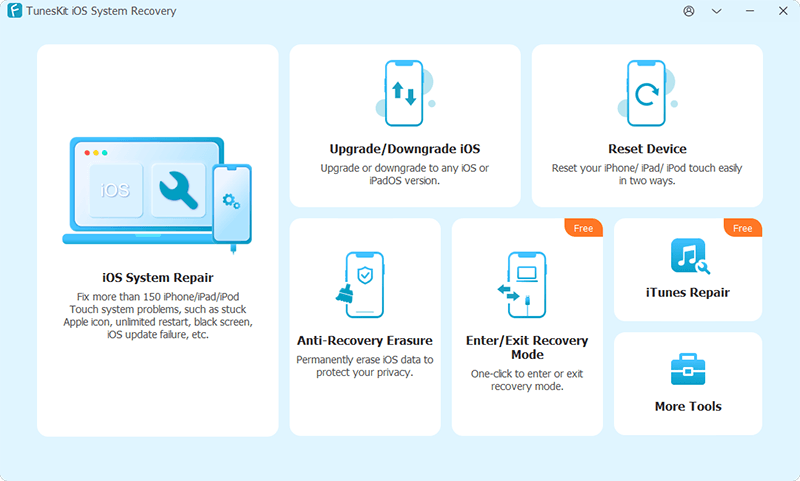
Note: Exiting or entering the iOS Recovery mode may sometimes require more attention from a third-party tool. TunesKit iOS System recovery is a professional desktop app that can be deployed. You only require one click to enter or exit iPhone recovery mode for free. Besides you can use this tool to help you solve various problems like the White Apple logo and boot loop screen, etc.
3.2 How to enter/exit DFU mode
Just follow the simple steps below to put your iPhone into the DFU mode:
Step 1. Connect your device to the computer and then launch iTunes;
Step 2. Turn the device off;
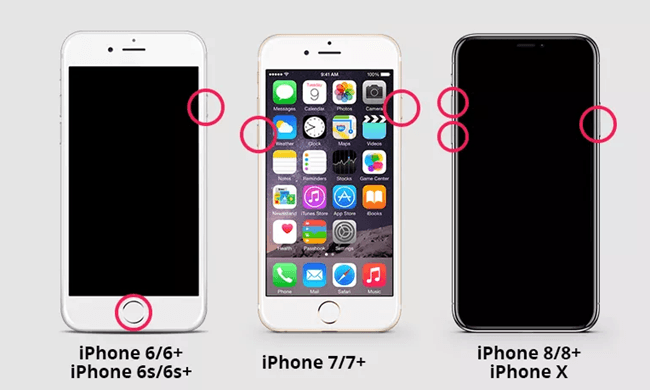
Step 3. Then hold down the lock button together with the Home button for about 10 seconds. Release the Lock button afterward;
Step 4. Keep on holding the Home button until iTunes displays a message that your device has been detected. In this case, your device screen will be completely black.
You can also exit DFU mode by doing as below:
Step 1. Press-hold both the Power button and the Home button until you see the Apple logo;
Step 2. Once the Apple logo appears, your device will reboot and exit DFU Mode.
4. How to Fix iOS Device Stuck on Recovery Mode or DFU Mode
4.1 How to fix when an iOS device is stuck on recovery mode
The reasons leading to an iPhone getting stuck on recovery mode include;
- When you are trying to update to the latest iOS software.
- Another cause is during jailbreaking of your device but then everything goes terribly wrong.
- It may also get stuck when you intentionally activate the recovery mode so as to solve a problem.
If you find yourself in such a case, you can fix iPhone stuck on recovery mode with iTunes Restore. Please be aware that you will lose all the data after restoring.
Step 1. Download the latest version of iTunes to your device;
Step 2. Hold the Home button down and then connect your device to the computer. Ensure you do this when iTunes is still open. You will be notified via a message that your iPhone needs to be restored;
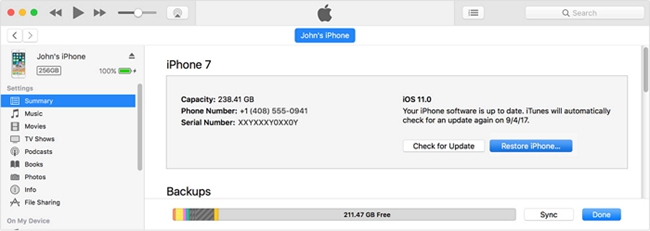
Step 3. The next step is to click on your device in the iTunes window and then go to the 'Summary tab';
Step 4. Then pick the 'Restore' option and backup your iPhone settings. Your phone will be automatically restored to the previous settings.
4.2 How to fix when an iOS device is stuck on DFU mode
Looking at Recovery mode vs DFU mode in this context, there are many reasons why your iOS device can be stuck. Going by the DFU mode, one of the reasons is when jailbreaking or un-jailbreaking your device. The other reason is from a hardware problem or even a software glitch.
The easiest way to fix iPhone stuck in DFU mode is to do a hard reset.
Step 1. Hold down the sleep/wake button together with the home button for close to 10 seconds;
Step 2. Then let go the moment the Apple logo appears so as to enable the device to restart.
4.3 How to fix iOS device stuck on recovery mode or DFU mode without data loss
No matter whether your iOS device is stuck on the DFU mode or recovery mode, if you don't want any data loss, a third-party professional iOS repair tool is needed. TunesKit iOS System Recovery is such an efficient program, which can help you fix more than 30 kinds of different iOS system problems with no risk of losing data, including stuck on recovery/DFU mode issues, stuck on white Apple logo, iPad won't turn off, iPhone keeps restarting, etc. You can also use it to bypass iTunes error, enter recovery mode in one click, etc. Recovering iOS back to normal with TunesKit only needs three steps:
Step 1. Download and install TunesKit iOS System Recovery to your computer and then simple open it. Use a USB cable to connect your stuck iOS device to the computer and press the Start button to begin after it's recognized by the program. Select the Standard Mode and press the Next button to proceed.
Step 2. Check the device info and correct it if anything is wrong. Click the Download button to download the corresponding firmware package and verify it then.
Step 3. After the process is done, click the Repair button to let TunesKit starting fix iPhone stuck issue and wait until the repairing process completes.
Conclusion
It is vital to know what recovery mode vs DFU mode entails. This way, you don't need to look for assistance whenever you are faced with common iOS problems. Simply follow the aforementioned steps to pull any issue in the right direction.